

Version Release Notes
Exploring the Importance of Version Release Notes
In the fast-paced world of technology, we are constantly updating TurboBid to provide users with better performance, enhanced features, and improved security. Whenever a new version of software is released, it is crucial for users to stay informed about the changes and updates that come with it. This is where version release notes play a vital role.
What are Version Release Notes?
Version release notes are documents that provide a detailed overview of the changes, improvements, and bug fixes that are included in a software update. They serve as a communication tool between the software company and its users, informing them about what to expect from the new version.
Why are Version Release Notes Important?
Transparency and Trust
By providing detailed release notes, software companies demonstrate transparency and build trust with their users. Users appreciate knowing exactly what changes have been made to the software they rely on.
Bug Fixes and Improvements
Release notes help users understand what bugs have been fixed and what improvements have been made in the new version. This information allows users to take advantage of these enhancements and avoid known issues.
Feature Updates
Version release notes also highlight any new features that have been added to the software. Users can learn about these features and how to make the most of them in their workflows.
Security Updates
In today's digital landscape, security is of utmost importance. Release notes often include information about security updates and patches, ensuring that users are aware of any vulnerabilities that have been addressed.
How to Access Version Release Notes
To access version release notes for a software update, simply visit the software company's website. Look for a section titled "Version Release Notes" or "Changelog" where you can find detailed information about the changes in the latest release. In some cases, software companies may provide release notes directly within the software application. You can typically find these notes in the "About" or "Help" section of the software.
Conclusion
Version release notes are an essential resource for users to stay informed about software updates and changes. By taking the time to read through release notes, users can make the most of the new version, stay up to date on bug fixes and improvements, and ensure that they are leveraging the latest features and security updates.
Version 5.13.15.0 Release Notes
-
Fixed a bug for the newly added additional labor with setting of "Crew" doesn't appear in some docs.
-
Improved Additional labor task Manpower selection screen in low resolution screens.
-
Fixed a bug for the stayed open report progress bars.
-
Fixed a bug for the Formal Proposals Payout Phase doesn't match the work order.
-
Fixed a bug for the Ok button in Additional Labor Selection.
-
Fixed a bug for newly added additional labor with setting of "Crew" doesn't appear in some docs.
Version 5.13 Release Notes
Fixed an issue where the Bid Package Builder failed to open under specific project settings tab.
Additional Labor Task Video Tutorial
Revised the Additional Labor Task.
You can select the radio button for Entire Crew or Selected Crew.
If you choose Entire Crew, the Average Cost will be used. The Average Pay Rate plus the Average Burden Rate will be used.
If you choose a jobsite employee for the task, the Average Cost will be used. The Average Pay Rate plus the Average Burden Rate will be used.
Improved the integration with PlanSwift for enhanced functionality and reliability.
Removed the "Per Unit" option from Additional Labor Task settings.
For existing tasks, the value has been updated to "One-Time Cost".
Fixed a bug in project security settings that occurred when adding a new user.
Restricted access to certain screens for non-admin users.
We have revised the Documents tab
We Have Added a "Bid Package" Button to the Documents Tab. Have you heard the news?
We have added a new feature to our platform that will make your bidding process even more streamlined and efficient. The "Bid Package" button is now available on the documents tab, allowing you to easily select the documents you want to include in your bid package with just a few clicks.
How Does the Bid Package Button Work?
When you click on the Bid Package button, a prompt will appear asking you to select the documents you wish to be included in your bid package. This process is quick and straightforward, allowing you to customize your bid package to include only the most relevant information for your project.
What Documents Can I Include in My Bid Package?
With the Bid Package button, you have the flexibility to choose from a variety of document options to tailor your bid package to your specific needs. From the Standard TurboBid Estimate to By Category and By Column options, you can select the documents that are most relevant to your project requirements.
Standard TurboBid Estimate:
This option allows you to generate a standard TurboBid estimate, providing you with a detailed breakdown of costs and materials.
- By Category: Per Plan, VE, Per Plan/VE, Option Tabs: Customize your bid package by selecting documents based on specific project categories, such as plans, value engineering, or optional tabs.
- By Column: Per Plan, VE, Per Plan/VE, Option Tabs: Choose documents based on columns for a more detailed view of your project estimates.
- VE: Add/Delete: Include documents that focus on value engineering.
- Bid Price by Phase, Option Price List, Work Order, Formal Proposal.
- Select from a range of documents to create a comprehensive bid package that meets your project requirements.
Service Work Estimate:
This option allows you to generate a service work estimate, providing you with a detailed breakdown of service work costs and materials.
- By Category: Per Plan, By Category: Option Tabs
- By Column: Per Plan, By Column: Option Tabs
- Time & Material, Option Price List, Work Order
- Formal Proposal
- Customize your bid package with documents that provide you with a detailed breakdown of service work costs and materials.
Why Use the Bid Package Button?
The Bid Package button offers a convenient and user-friendly way to create customized bid packages that meet your customers’ needs.
With a variety of document options to choose from, you can ensure that your bid package includes all the necessary information for a successful bid.
So why wait? Try out the Bid Package button today and experience a more efficient and effective bidding process for your projects.
In Conclusion
The addition of the Bid Package button to our platform is just one more way we providing our users with the tools they need to succeed.
With customizable document options and a user-friendly interface, creating a personalized bid package has never been easier. Give it a try and see the difference it can make for your next bid.
Revised the Formal Proposal: Enhancing Clarity and Transparency
Formal Proposal Video Tutorial
Are you looking to improve the clarity and transparency of your formal proposals? We have revised the Formal Proposal to make it easier for you and your clients to understand the details of the project.
Benefits of the Updated Formal Proposal
The updated Formal Proposal now includes the Payout Phase Draw amounts for each estimate, making it clear and concise for both parties involved. The addition of the Option tabs allows for easy navigation and access to specific sections of the proposal, ensuring that all necessary information is easily accessible.
Increased Transparency with Tab #1 Selection
With Tab #1 selected by default, clients can quickly review the essential details of the proposal at a glance. This provides a quick overview of the project scope, budget, and timelines, allowing for faster decision-making and approval.
Customization with Tab #2
For more detailed information or specific options, clients have the flexibility to switch to Tab #2. This allows for customization of the proposal based on the client's preferences and requirements, ensuring a tailored approach to each project.
Simplifying the Total Bid Price
The Total Bid price is now prominently displayed in the Formal Proposal, making it easy for clients to understand the overall cost of the project. This transparency fosters trust and confidence in the pricing, showing a clear breakdown of costs and ensuring no surprises down the line.
In conclusion, the revised Formal Proposal offers enhanced clarity, transparency, and customization options for both clients and service providers. By incorporating Payout Phase Draw amounts, Option tabs, and Total Bid price, the proposal becomes a more effective tool for communication and decision-making. Upgrade your proposal process today with these improved features!
We have the ability to add to our Master Database located on a secure Microsoft Azure server.
Material Templates for Estimates Video Tutorial
We Have the Ability to Add to Our Master Database
As a top-tier provider of construction estimation software, we offer a wide range of features that set us apart from the competition. One such feature is our ability to add to our Master Database located on a secure Microsoft Azure server. This allows our users to access a vast library of items, templates, and assemblies that can streamline their estimating process and improve the accuracy of their bids.
Virtual Items (TurboCloud)
Our Virtual Items, powered by TurboCloud technology, are a game-changer for construction estimators. These virtual items are pre-built components that can be easily added to your estimates, saving you both time and effort. With a few clicks, you can insert these items into your estimate and adjust the quantities and prices to fit your specific project requirements. Say goodbye to manual data entry and hello to increased efficiency and accuracy.
Material Templates for Estimates
In the world of construction estimating, time is of the essence. That's why we offer Material Templates for Estimates, which are pre-configured lists of materials commonly used in commercial and residential projects. These templates can be easily customized to fit your specific needs, saving you valuable time during the estimating process. Whether you're working on a large commercial project or a smaller residential job, our Material Templates have got you covered.
Commercial and Residential Estimates
When it comes to estimating software, one size does not fit all. That's why we offer separate Material Templates for Estimates for Commercial and Residential estimates. These Material Templates for Estimates contain copies of items that are specific to each type of project, ensuring that your estimates are as accurate as possible. Whether you're pricing out a commercial office building or a residential home renovation, our specialized Material Templates for Estimates have the items and assemblies you need to get the job done right.
Option Price List Estimates
For projects with multiple options and upgrades, our Option Price List feature is a game-changer. This feature allows you to create a list of optional items that can be easily added to your estimates. With the click of a button, you can insert these items, complete with pricing and quantities, to give your clients a clear picture of their options. This not only streamlines the estimating process but also enhances communication with your clients, leading to more successful projects.
Virtual Assemblies (TurboCloud)
Finally, our Virtual Assemblies feature is a powerful tool for construction estimators. These virtual assemblies are pre-built groups of items that are commonly used in construction projects. By adding these assemblies to your estimate, you can quickly and accurately price out complex components of your project, saving you time and improving the accuracy of your bids. With Virtual Assemblies, you can take your estimating game to the next level.
In Conclusion
Our construction estimation software offers a wealth of features that are designed to streamline your estimating process and improve the accuracy of your bids.
From Virtual Items and Material Templates for Estimates, Option Price Lists, Virtual Items and Virtual Assemblies, we have everything you need to succeed in the competitive world of construction estimating.
Try us out today and experience the difference for yourself!
Option Price List Estimates
Option Price List Video Tutorial
For projects with multiple options and upgrades, our Option Price List feature is a game-changer. This feature allows you to create a list of optional items that can be easily added to your estimates. With the click of a button, you can insert these items, complete with pricing and quantities, to give your clients a clear picture of their options. This not only streamlines the estimating process but also enhances communication with your clients, leading to more successful projects.
TurboCloud Items Folder: A Step-by-Step Guide
TurboCloud Items Folder Video Tutorial
We have revised the Standard Items
The first thing you will notice when you log into the system is the updated layout of the Standard Items section. To access this feature, simply navigate to the folders tab and expand it until you find a folder with Items in it. This organization allows you to easily locate the items you need, saving you time and effort when creating estimates or invoices.
Expand the folders until you find a folder with Items in it
Once you have located the folder with the items you are looking for, the next step is to expand it to view the individual items. Simply click on the arrow next to the folder name, and a list of items will appear below it. This streamlined design is meant to enhance your user experience, eliminating unnecessary steps and making the process more efficient.
Right-click on the folder and you will see a menu
To further simplify the process, we have added a right-click menu that provides quick access to common actions. When you right-click on the folder containing the items, a menu will pop up with options such as "Add to Estimate" and "Delete." This menu makes it easy to perform actions without having to navigate through multiple screens, saving you valuable time and effort.
Click "Add to Estimate" to add the Items to an open estimate
One of the key features of the revised Standard Items system is the ability to quickly add items to an open estimate. Simply right-click on the desired item, select "Add to Estimate" from the menu, and the item will be automatically added to your current estimate. This streamlined process eliminates the need for manual entry, reducing the risk of errors and ensuring accuracy in your estimates.
Click "Delete" to delete the folder
In addition to adding items to estimates, you can also easily delete unnecessary folders or items using the new system. If you no longer need a specific folder, simply right-click on it, select "Delete" from the menu, and the folder will be removed from your list. This feature helps you keep your workspace organized and clutter-free, improving your overall productivity.
In conclusion
the revised Standard Items system is designed to enhance your user experience by providing a more intuitive and efficient way to manage your items and estimates. By following the simple steps outlined in this guide, you can master the new system and take full advantage of its features. So why wait? Dive in today and experience the benefits of the updated Standard Items system for yourself!
As the world of technology continues to evolve, it's important to stay up-to-date with the latest advancements in software systems.
With our newly revised Standard Items feature, you can navigate your items and estimates with ease, saving time and improving overall efficiency.
Don't miss out on the opportunity to streamline your workflow and enhance your user experience. So why not give it a try today? Master the new system and take your productivity to the next level!
TurboCloud Assemblies Folder: A Step-by-Step Guide
TurboCloud Assemblies Folder Video Tutorial
How to Efficiently Manage Standard Items in Your Estimating Software
Are you struggling to navigate through the standard items in your estimating software? Are you looking for a quick and easy way to add assemblies to your estimate or delete unnecessary folders? Look no further! In this article, we will walk you through the process step-by-step, so you can efficiently manage your standard items with ease.
We have revised the Standard Items
First and foremost, it's important to note that we have recently revised the standard items in our software to make it more user-friendly and intuitive. The new layout and organization of the folders will streamline your estimating process and save you valuable time. So, let's dive in and explore how you can expand the folders to find the assemblies you need.
Expand the folders to find Assemblies
To begin, open up your estimating software and locate the standard Assemblies section. Expand the folders until you come across a folder that contains the assemblies you are looking for. Once you have identified the correct folder, right-click on it to bring up a menu of options.
Right-click on the folder and Add to Estimate
Next, you will see a menu pop up when you right-click on the folder. Among the options listed, you will find "Add to Estimate." Click on this option to add the assemblies within the folder to your open estimate. This simple step eliminates the need to manually input each assembly, saving you time and effort.
Click "Delete" to remove unnecessary folders
In some cases, you may come across folders that are no longer needed or contain outdated information. If this is the case, simply right-click on the folder and select "Delete" from the menu. This action will remove the folder and its contents from your standard items, decluttering your workspace and improving organization.
Conclusion
In conclusion, managing standard Assemblies in your estimating software can be a breeze if you know the right steps to take. By expanding folders, adding assemblies to estimates, and deleting unnecessary folders, you can streamline your workflow and increase productivity. Remember to take advantage of the recent revisions to the standard items layout to make your estimating process as smooth as possible.
So, next time you find yourself overwhelmed with standard items, remember these simple instructions to navigate with ease. By following these steps, you can become a pro at managing standard items in your estimating software. Happy estimating!
Learn how to efficiently manage standard items in your estimating software by expanding folders, adding assemblies, and deleting unnecessary folders with our step-by-step guide.
Remember, practice makes perfect, so don't be afraid to experiment and explore the features of your estimating software to find what works best for you. With a little bit of patience and persistence, you'll be a master at managing standard items in no time!
Virtual Item (TurboCloud) Option Price List
Are you looking to streamline your estimating process for construction projects? Look no further! With the Virtual Item (TurboCloud) Option Price List, you can easily add copies of Items to your estimate, making the process more efficient and accurate. Let's dive into how this innovative tool can benefit you.
What is the Virtual Item (TurboCloud) Option Price List?
The Virtual Item (TurboCloud) Option Price List is a game-changer for construction professionals. It allows you to add copies of Items to your estimate with just a few clicks, saving you time and reducing the risk of errors. Imagine being able to quickly and easily access a list of pre-populated Items that you can simply drag and drop into your estimate. This tool offers convenience and precision, making your estimating process smoother and more reliable.
How does it work?
Using the Virtual Item (TurboCloud) Option Price List is a breeze. Simply log in to your account, select the Items you want to add to your estimate, and drag them over. You can customize the quantities and prices as needed, giving you full control over your estimate. With this tool, you can say goodbye to manual data entry and hello to a more efficient estimating process.
Virtual Assemblies (TurboCloud) Option Price List
In addition to the Virtual Item (TurboCloud) Option Price List, TurboCloud also offers Virtual Assemblies. These are copies of pre-configured Assemblies that you can add to your estimate with ease. By using Virtual Assemblies, you can save even more time and ensure consistency across your projects.
What are the benefits of using Virtual Assemblies?
Virtual Assemblies are a valuable resource for construction professionals. By adding pre-configured Assemblies to your estimate, you can speed up the estimating process and reduce the risk of errors. With Virtual Assemblies, you can ensure that your estimates are accurate and consistent, leading to better project outcomes.
How can you access Virtual Assemblies?
Accessing Virtual Assemblies is simple. Just like with the Virtual Item (TurboCloud) Option Price List, you can log in to your account, select the Assemblies you need, and drag them into your estimate. You can then customize the quantities and prices as required, giving you the flexibility to tailor your estimate to the specific needs of your project.
In conclusion, the Virtual Item (TurboCloud) and Virtual Assemblies Option Price Lists are powerful tools that can revolutionize your estimating process. By leveraging these tools, you can save time, reduce errors, and improve the accuracy of your estimates. Say goodbye to tedious manual data entry and hello to a more efficient and reliable estimating experience with TurboCloud. Try it out today and see the difference for yourself!
We have revised the "Material Take-Off" tab.
Category Display Video Tutorial
Learn about the latest updates to the Material Take-Off tab and how they can enhance your workflow.
Choose to have Categories expanded or collapsed by default for a more customized experience.
Introduction
In today's ever-evolving digital landscape, user experience is key when it comes to software and tools. We understand the importance of efficiency and ease of use, which is why we have made exciting enhancements to the Material Take-Off tab. With the addition of a Category Display button, users now have the flexibility to choose how they want to view their Categories. Let's delve into these new features and how they can streamline your workflow.
We have revised the "Material Take-Off" tab
The Material Take-Off tab is a vital tool for tracking and managing materials for construction projects. With our recent revision, we have made it even easier to navigate and organize your data. The new Category Display button allows you to customize your view, making it a more personalized experience. With just a few clicks, you can toggle between expanded or collapsed Categories based on your preference. This level of customization puts the power in your hands, allowing you to work more efficiently and effectively.
We have added a Category Display button
The addition of the Category Display button brings a new level of functionality to the Material Take-Off tab. Now, you can easily switch between expanded and collapsed Categories with just a simple click. This feature gives you greater control over how you view and interact with your data, making it easier to find what you need quickly. Whether you prefer a more detailed view or a streamlined overview, the Category Display button allows you to tailor your experience to suit your workflow.
You can choose to have the Categories expanded by default
For users who prefer to have a more detailed view of their Categories, the option to have them expanded by default is now available. This means that when you open the Material Take-Off tab, all Categories will be displayed in full, giving you a comprehensive overview at a glance. This setting is perfect for users who want to see all their data upfront and dive into specific Categories as needed.
You can choose to have the Categories collapsed by default
Alternatively, if you prefer a more simplified view, you can choose to have the Categories collapsed by default. This setting condenses the display, showing only the main Categories with the option to expand each one individually. This streamlined view is ideal for users who prioritize a clean and organized workspace, allowing for a more focused and efficient workflow.
In Conclusion
The enhancements to the Material Take-Off tab offer a more user-friendly experience, allowing you to customize your view and streamline your workflow. By giving you the flexibility to choose how you interact with your data, we aim to empower you to work more efficiently and effectively. Try out the new Category Display button today and see how these updates can enhance your project management experience.
Introducing the Enhanced Material Take-Off Tab Experience
Have you ever struggled with navigating the Material Take-Off tab in your construction software? If so, you're in luck! We have recently revised the Select Columns button to make your experience smoother and more efficient. In this article, we will walk you through the exciting updates we have made to enhance your workflow.
What's New with the Material Take-Off Tab?
One of the key improvements we have implemented is the addition of a dropdown list to the Master Heading List. This change allows you to easily access different categories of items, making it simpler to find what you're looking for. Let's take a closer look at the new dropdown options:
Commercial
The Commercial category now houses all of the items in the Commercial Master Heading List. Whether you're working on a large-scale project or just need to quickly pull up commercial materials, this category has you covered.
General
The General category contains all of the items in the Master Heading List. This is your go-to option for a wide range of general materials that are commonly used in various types of construction projects.
Residential
Need to focus on residential materials? The Residential category is where you'll find all of the items in the Residential Master Heading List. From fixtures to finishes, this category is tailored to meet the specific needs of residential construction projects.
Option Price List
Last but not least, the Option Price List category includes all of the items in the Option Price List Master Heading List. This category is ideal for managing pricing information for different options and upgrades, helping you stay organized and efficient.
How Will This Benefit You?
With these enhancements, you can expect a more streamlined and intuitive experience when working with the Material Take-Off tab. No more searching through long lists of items – simply choose the relevant category from the dropdown list and access the materials you need in seconds. This efficiency can save you time and simplify your workflow, allowing you to focus on other important aspects of your project.
In addition, the enhanced Select Columns button improves visibility and organization, making it easier to customize your view and display only the information that matters most to you. Whether you're a seasoned user or new to the software, these updates are designed to enhance your overall user experience and increase your productivity.
Conclusion
In conclusion, the recent revisions to the Material Take-Off tab's Select Columns button have made a significant impact on the usability and functionality of the feature. The addition of the dropdown list to the Master Heading List offers users a more organized and efficient way to access materials, saving time and improving workflow. We are committed to continually enhancing our software to meet the evolving needs of our users, and we hope these updates will empower you to work more effectively and efficiently. Try out the new enhancements today and experience a better way to manage your construction projects!
We have Added a Flat Rate tab to the Item Editors and Assembly Editors can be a valuable enhancement for managing Flat Rate Pricing.
Global Flat Rate Settings Video Tutorial
Assembly Editor Video Tutorial
The addition of a "Display Options" button in TurboCloud for both Items and Assemblies is a great enhancement for user control and customization. This feature can significantly improve how users interact with and view their data.
- This allows you to show your customers the TurboCloud Grid View.
- This will be helpful if you select the Display Option for "No Material or Labor".
- Showing pictures of items and assemblies to customers can significantly enhance communication and ensure everyone has a clear understanding of what will be installed.
- Showing customers the TurboCloud Grid View with the Flat Rate Price can be a powerful way to present pricing information clearly and transparently.
- Displaying a "Regular View" in the Grid View of TurboCloud with key details such as Manufacturer, Catalog #, TurboBid Price, and Labor Units can greatly enhance the way users view and analyze item and/or assembly data.
- In the Grid View of TurboCloud, you can select to display the "Regular View" for Assemblies, which displays the Material Cost and Labor Units.
- The ability to display "No Material or Labor" in the Grid View of TurboCloud for Items and Assemblies is a useful feature for highlighting specific aspects of your data.
- This can help customers focus on items and assemblies that lack associated material cost or labor cost.
- Displaying "Global Flat Rate Settings" in the Grid View of TurboCloud is a powerful feature for providing a consistent view of Flat Rate Pricing settings across items and assemblies.
- Selecting a Global Mark-Up % for both Items and Assemblies in TurboCloud is a powerful feature that helps in applying a consistent Flat Rate Pricing.
- Automatically entering the Average Pay Rate and Average Burden Rate in the Jobsite Employees tab of an estimate can significantly streamline the process of estimating labor costs and ensure consistency across estimates.
- The sales tax that you have entered into the Bid Price Data tab willl automatically be entered.
Adding a Flat Rate Pricing tab to the Item Editors and Assembly Editors and enabling the ability to right-click on a folder to enter a Mark-Up % is a practical enhancement for managing pricing strategies efficiently. Here’s how to effectively implement and utilize these features:
Implementing and Utilizing the Flat Rate Pricing Tab and Mark-Up % Functionality
- Feature Implementation
- Flat Rate Pricing Tab: Add a dedicated Flat Rate Pricing tab to both Item Editors and Assembly Editors. This tab should allow users to enter and manage flat rate pricing details, including Mark-Up %.
- Right-Click Functionality: Implement a right-click context menu on folders within the Item Editors and Assembly Editors that provides an option to quickly enter or adjust the Mark-Up %. This feature should be intuitive and easy to access.
- The following formula is used to calculate the Flat Rate Pricing.
- (Material Cost * Sales Tax) + (Labor Hours * Jobsite Avg Cost) * Mark-Up %
- I was an electrical contractor in Illinois for a couple of decades.
- We did a lot of Tract Projects for National Builders.
- I believe that this concept will work well for commercial and industrial estimates as well.
- We would always include an "Option Price List" in our bid package.
- We kept of bid prices low enough so that we would win the project.
- We made between 180% to 360% profit margins if the home buyer wanted to anything from the "Option Price List", such as dimmers, receptacles, paddle fans, recessed downlights, etc.


We have added two new ways to add material to the "Material Take-Off Tab".
Add Items and/or Assemblies to the Take-Off Tab Video Tutorial
- You can click the "Add Material" button in the "Material Take-Off Tab".
- This will bring up the screen where you can see the Items and/or Assemblies that are in the estimate.
- Expand the tree to find the Items and/or Assemblies that you want to add to the estimate.
- Check the check boxes for the Items and/or Assemblies that you want to add to the estimate.
- Click the "Add To Take-Off" button
TurboCloud Add Items and/or Assemblies to the Take-Off Tab Video Tutorial
- Open TurboCloud.
- Click on the Items or Assemblies tab.
- Expand the tree to find the Items and/or Assemblies that you want to add to the estimate.
- Hover your cursor over the Items and/or Assemblies.
- You will see "Check Boxes" in front of the Items and/or Assemblies.
- Check the "Check Boxes" for the Items and/or Assemblies that you want to add to the estimate.
- You will see how many Items and/or Assemblies will be added to the estimate.
- Click on the "Selected: Add to Estimate" link to add the Items and/or Assemblies that you want to add to the estimate.
You currently have a Virtual Library for Items and Assemblies in TurboCloud.
- This makes a virtual copy of the original item.
- These are usually items and/or assemblies that you use a lot.
- You can right click on these items or assemblies, and click on "Add to Open Estimate".
We have added an Virtual Library (TurboCloud) to the master database that is hosted on a secure Microsoft Azure Server.
Material Templates for Estimates Video Tutorial
- There is a folder titled "Material Templates for Estimates".
- We are adding the following "Material Templates for Estimates".
- Commercial
- Residential
- There is a folder titled "Option Price List" in the Virtual Library (TurboCloud) folder.
- There is a document named "Option Price List" in the Documents tab.
- We recently released a "Global Flat Rate Settings" for Items and Assemblies.
- You can select a Global Mark-Up % for both Items and Assemblies.
- In the Grid View of TurboCloud, you can select to display the "Global Flat Rate Settings" for Items and Assemblies.
- Since you have the ability to set "Global Flat Rate Settings" for Items and/or Assemblies".
- Since we've added a Flat Rate Pricing tab to the Item Editors and Assembly Editors, you can quickly right click on a folder and enter a Mark-Up %.
- In the Documents tab, there is a document named "Option Price List".
- We made between 180% to 360% profit margins if the home owner wanted to add anything from the "Option Price List", such as dimmers, receptacles, paddle fans, recessed downlights, etc.
- I believe that this concept will work well for commercial and industrial estimates as well.
Version 5.12.29.0 Release Notes
Revised the Invoice, Pricing Detail, and Work Order documents for Additional Labor Tasks.
* The quantity will now display the rounded up days and weeks for additional labor tasks.
Revised the Bid Price by Phase document selector to allow you to select if you need to charge sales tax to your customers.
Revised the Bid Price Data > Direct Cost Detail tab to display the additional Labor Tasks to display the actual hours.
The Jobsite Employee's Additional Labor tasks formula has been revised.
Version 5.12.26.0 Release Notes
The Jobsite Employee's Additional Labor tasks formula has been revised.
You can select a different database, if your current database has failed to connect to TurboBid.
If you change anything in an item or assembly, the message in the prompt has changed.
* Do you want to save the changes that you just made?
You can select a different database, if your current database has failed to connect to TurboBid.
If you change anything in an item or assembly, the message in the prompt has changed.
* Do you want to save the changes that you just made?
* You can view or modify these settings by clicking on the "Other Options" tab in the Item Editor. If you want to prevent the Item's values from reverting to their original state during cloud synchronization, simply uncheck the checkbox.
* Click either the "Yes" or "No" buttons.
Since we have added "Do you want to save the changes that you just made?" we have removed the "Click here to view settings" from the TurboCloud synchronization process.
We have replaced the spreadsheet with a newer version of the spreadsheet. This has fixed many of the issues when using the spreadsheets.
We have fixed an issue when selecting an estimates columns. If you add a column from the Master Heading List, you no longer have to redo the values.
We have fixed an issue when Refreshing Planswift. If you select "Refresh", all of the items and assemblies are refreshed so that they will display the quantities in Planswift.
When you select a Planswift "Count", or "Linear Measurement" in TurboBid's take-off tab, Planswift is automatically opened up. When you select to "Stop" the "Count", or "Linear Measurement", TurboBid is automatically opened up.
In the Format Formal Proposal's Light Fixture Inclusion screen, we have replaced "Missing or Burned Out Lamps" with "Fixtures Are to be Pre-Assembled".
In the Format Formal Proposal's Light Fixture Inclusion screen, we have replaced "Missing or Burned Out Lamps" with "Fixtures Are to be Pre-Assembled".
We have revised the Invoice, Pricing Detail, and Work Order to allow you to select to check a checkbox that will "Show Line Item Bid Prices" and "Show Bid Price Total". This allows you to not display Line Item Bid Prices, while displaying the Bid Price Total at the end of the documents.
We have added the Activated Computer Name to the TurboBid License tab.
Version 5.12.10.0 Release Notes
Select to Create a Service Work Estimate.
Quickly select what you want to do.

We have revised the Customer / Project Info tabs. This also applies to Standard Estimates.
We have combined the Customer Info and Project Info tabs into a single tab.
We have also removed the # of Units section from Service Work estimates. This allows you to use different Direct Costs for each estimate. For example, you can use different jobsite employees or different Additional Labor for each estimate.
* Service Work: Customer / Project Info Tab Video Tutorial
* Standard Estimate: Customer Information Section Video Tutorial
* Standard Estimate: Project Name Section Video Tutorial
* Standard Estimate: Production Information Section Video Tutorial

Enter the Estimate's Name and the Scope of Work.
The Scope of Work tab is where you create the estimates for the project. We have added an Estimate Dropdown above the Project Tabs. The dropdown contains all of the estimates in the project. The Scope of Work will be to the right of the dropdown.
An example of the scope of work might be: Relocate the Microwave Receptacle and the Refrigerator Receptacle.
* Scope of Work Tab Video Tutorial

We have revised the Take-Off tab. We have also revised the Standard Estimates Take-Off tab.
Enter the material quantities, additional minutes needed to gain access, to drill obstacles and fish wire, and increase labor in the event that a worse-case scenario happens.
You can add a location or a description of the service work that you will perform to the take-off tab. Checkboxes are included next to the location or description of the service work. Select an estimate and check the box for the location or description of the service work to be added to the estimate.
* Select Columns Video Tutorial
Add items and/or assemblies to the service work take-off tab.
The material sort order lets you rearrange the order that your material is displayed to facilitate the way that you take-off an estimate.
* Material Sort Order Video Tutorial
You can change the take-off tab names.
We have added textboxes to the take-off tab that contain various costs for the current take-off tab. These include material and labor costs, time and material tasks for material and labor costs, labor for gaining access for service work tasks, labor for drilling through obstacles to feed the device, ability to add minutes or a percentage for flat rate pricing, total labor, total labor cost, misc. expenses, overhead cost, profit amount, and bid price.
* Data Text Boxes Video Tutorial
Service Work Estimate's Take-Off Tab

Standard TurboBid Estimate's Take-Off Tab (No Access, Obstacles, or WCS)

Add Time & Material Tasks or Temporary Assemblies. This also applies to Standard Estimates.
Time and Material Tasks allow you to add Time and material tasks, or temporary assemblies, to the take-off tab. Enter a description of the task or assembly, the labor hours to install the material, and the material cost.
* Time & Material Tasks Video Tutorial

Each Employee can use a Billable Rate Per Hour. This also applies to Standard Estimates.
We have revised the Employee wizard.
We have added Field Employee checkboxes that when checked, will add the Employee to the Overhead Calculator. This is important because the Overhead Rate Per Hour is based on the Employee Hours that you can bill out for the year.
It also allows you to enter the percentage that you want to make on the employee's Billable Rate Per Hour.
* Employee Wizard Video Tutorial

The Billable Rate is based on the Overhead Calculator. This also applies to Standard Estimates.
The Jobsite Employees are automatically added to the Overhead Calculator.
* Overhead Calculator Video Tutorial

We have revised the Direct Cost tabs. This also applies to Standard Estimates.
You can save the settings as the Default Value for each tab. This will allow you to complete estimates faster.
We have also removed the # of Units section from the Project Info tab. This allows you to use different Direct Costs for each estimate.
You can use a different number of Jobsite Employees for each estimate.
* Jobsite Employees Tab Video Tutorial
You can use different Additional Labor cost for each estimate.
* Additional Labor Tab Video Tutorial
You can use different Misc. Direct Job Expenses cost for each estimate.
* Misc. Direct Job Expenses Video Tutorial
You can use different Tools cost for each estimate.
You can use different Subcontracts cost for each estimate.
* Subcontracts Tab Video Tutorial

We have revised the Bid Price Data > Direct Cost Detail tab.
We have added line items for the following:
T&M Material
T&M Billable Rate
T&M Pay Rate / Burden
Access/Obstacles/WCS
* Direct Cost Detail Tab Video Tutorial

We have added a Display Option button to TurboCloud's Item and Assembly tabs.
We have added a Display Options button to TurboCloud’s tool strip.
TurboCloud makes the ultimate Flat Rate Price Book. It displays Pictures, Catalogs, Spec Sheets, Catalog Descriptions, Specifications, etc.
You can show your customer's TurboCloud so that they can see what items and or assemblies are available to be installed in their project.
You can choose between the following Display Options:
* Display Option Video Tutorial
Regular View: Displays the Manufacturer Name, Catalog Number, TurboBid Price, and Labor Unit.
No Material Pricing or Labor Units: Displays the Manufacturer Name and Catalog Number.
Flat Rate Pricing Mark-Up: Displays the Manufacturer Name, Catalog Number, and Flat Rate Price.
The Display Option button will open a new screen where you can select TurboCloud's Display Option.

Regular View
Items: Displays the Manufacturer Name, Catalog Number, TurboBid Price, and Labor Unit.
Assemblies: Displays the Material Price and Labor Hours.

No Material Prices or Labor Units
Items: Displays the Manufacturer Name and Catalog Number.
Assemblies: Displays no data.

Flat Rate View
Items: Displays the Manufacturer Name, Catalog Number, and Flat Rate Price.
Assemblies: Displays the Flat Rate Price.

We have revised the Documents tab.

We have added a Time and Material Document

Version 5.11.1.0 Release Notes
New Video Tutorials were added to various video players
TurboCloud Item video player
Material Take-Off Tab video player
We have revised the Item Copy/Paste process
Paste as Duplicate
1) This will paste a duplicate copy. If you choose this option, make sure to revise the item's fields since they will probably be different.
Paste as Virtual
1) This will paste a virtual item. This feature allows you to add virtual copies within your database as needed. When you open a virtual copy, it opens the original. Any changes that you make to the original item will be reflected in the virtual copies.
We have added a Specification Filter to TurboCloud Items and Assemblies
Most items and assemblies have Specifications
We have revised the Material Take-Off Tab
We have added a button in the take-off tab ribbon that will allow you to hide or display Tab #2
We have revised the Advanced Group Renaming process in TurboCloud
1) If you are using the specification filter, when you use the Advanced Group Renaming process, only the items or assemblies that are displayed due to the filter, will reflect the new name.
We have revised the Estimate Tab
1) You can now edit or remove the Estimated By field.
Version 5.10 Release Notes
Added the ability to import a list of new items into your database. (View Video Tutorial)
Added a new "Import Items” icon to TurboCloud’s toolbar. (View Image)
The new "Import Items” icon opens a "TurboCloud Admin Help” screen.
Added a new "Import New Items” grid. (View Video Tutorial)
Revised the "Update Vendor Pricing with TurboPricer" process. (View Video Tutorial)
Added the ability to create virtual copies of the items in your database. (View Video Tutorial)
The TurboPricer exception report has been moved.
The items that you create on your own are no longer uploaded to the TurboCloud team.
We have revised the material screen. (View Video Tutorial)
Version 5.9 Release Notes
Added an analytical tool to TurboPricer so that you can compare your current vendor prices with the new vendor prices.
Revised the Formal Proposal to include the Proposal To section located in the Customer Info tab. (View)
Revised the Take-Off Analytical Details document so that additional labor in displayed in the Labor columns. (View)
Added a prompt asking you if you want to exclude the changes that you made when renaming items.
- If you rename an item or use the Advanced Group Renaming feature, you will receive a prompt asking you if you want to exclude the changes that you made from reverting to the cloud values during future TurboCloud Synchronizations.(View)
- If you select "Yes”, the changes you made will automatically be excluded from future TurboCloud Synchronization process.
- In other words, you can change an item’s data to reflect what you want it to be without worrying that the data will be changed back during a TurboCloud Synchronization.
Version 5.8 Release Notes
Added a "Vendor” (Supply House) filter to the TurboCloud items screen. (View)
- The Item Editor's "Pricing Details" tab includes a section that lists your vendors that carry the item. (View)
- TurboCloud's administrator has been using our customer's Vendor Price Update Files to add the selected vendor to each item in the price file.
- The vendor's price is not added until you run a vendor price update file or run a TurboPricer update.
- TurboCloud's administrator has been using our customer's Vendor Price Update Files to add new items to TurboCloud.
- The vendor filter can be toggled on and off or hidden.
- The vendors that you have selected in the "Manage Vendors” screen will be displayed in the filter. (View)
- If you do not have any vendors selected in the manage vendors section, all vendors will be displayed.
- Each vendor displayed in the filter can be selected by checking the vendor’s checkbox.
- If a vendor is selected, only items that include the selected vendor will be displayed in the item tree and grid.
- This will allow you to view the items that your vendor(s) carry.
- This will make it easy to substitute assembly items with items that your vendor(s) carries.
Added a search "By Folder Name” feature to find and display folders with a specific name. (View)
The Work Order, Pricing Detail and Invoice documents have been revised to sort alphabetically.
The search feature has been revised to return more results. Please keep your search terms as short as possible.
If you select to expand folders in TurboCloud, and the folder includes hundreds of child folders, the expansion can take some time. You can now click your keyboard's "Escape" button to cancel the folder expansion.
Version 5.7 Release Notes
We have made it easier for you to edit an item’s data without worrying about the data reverting to the cloud master value during a TurboCloud Synchronization.
- When you have a TurboCloud subscription, our TurboCloud administrators can manage the data for the items in your local database. (View)
- We have revised the Item Editor so that any changes that you have made to an item’s data will cause a prompt to appear, asking you if you want to exclude the changes that you made from reverting to the cloud values during future TurboCloud Synchronizations. If you select "Yes”, the changes you made will automatically be excluded from future TurboCloud Synchronization process’. In other words, you can change an item’s data to reflect what you want it to be without worrying that the data will be changed back during a TurboCloud Synchronization. (View)
- Revised the Item Editor’s "Other Options” tab to include checkboxes for each of the following data points: (View)
- Update Description
- Update Job Phase
- Update Catalog Description
- Update Labor Unit
- Update Manufacturer
- Update Quantity Take-Off Text
- Update UPC
- Update Catalog #
- Update Package Quantity
- These check boxes will be checked by default. However, if you edit these data points in the item editor, the checkbox will become unchecked and the data that you edited will not be updated during a TurboCloud Synchronization.
- The "Sync local database with cloud database maintained by TurboBid” screen includes a link to view the item data changes. This is the "Sync Local Items (Click here to view settings)" link. (View)
- The "(Click here to view settings)" link opens the Item Update screen. This screen displays all the items that have different data values in your local database versus the cloud master database. Each item displays the data in your local database and compares it with the data in the cloud master database. (View)
- Checkboxes are included for all the data points listed above. If the checkbox is checked, the data will be updated during the Synchronization.
- The checkboxes in the Item Editor and the Item Update screen are tied together. This means that if you check, or uncheck, a checkbox in the Item Update screen, the same checkbox in the Item Editor will also be checked or unchecked. You can adjust what data gets updated directly from the Item Update screen without having to go to each Item Editor.
We have added the Price Status to the Item Editor. (View)
- Active: The item has an active price.
- Discontinued: The manufacturer has discontinued the item.
- POA: Price on Application. The manufacturer is no longer providing pricing on the item. Prices listed are the last known prices.
- Unlisted: The item is currently unlisted. Prices listed are the last known prices.
We have added the ability to add a package quantity to "Per 100” and "Per 1,000” Unit of Measures. (View)
- This does not affect the pricing in your estimates. The purpose of this feature is to help you order the correct quantities of material in the Material Screen.
- For example, your estimate includes 100’ of #14 THHN wire. #14 THHN wire is only sold in spools of 500’.
- The #14 THHN wire item has the following values.
- UOM of "Per 1,000”.
- Package Quantity of 500’.
- The material screen will include the following to help you order the correct quantities of #14 THHN wire.
- Bid Quantity of 100’.
- You will receive an alert that the "Package Quantity” is 500’ (View).
- If you click on the alert, it will automatically order the correct amount. (View)
- The additional cost for ordering the minimum package quantity will be displayed.
- If you won’t be able to use the additional material in a future project, check the checkbox to add the additional cost to the estimate.
We have added a "Package Quantity” selection to the "Pricing Detail > Manage Vendors” section of the Item Editor. (View)
- While the Item Editor includes a "Package Quantity” on the Overview tab, it’s possible that your vendor pricing might be for a different Package Quantity. (View)
- For example, let’s say that an item is for a box of 10 light bulbs.
- The TurboBid Price is $100.
- The Pricing Unit of Measure is "Per Box”.
- The Package Quantity is "10”.
- For estimating purposes, the TurboBid Price will be divided by the Package Quantity to determine the price per each light bulb in the box.
- $100 / 10 = $10 per light bulb.
- Now let’s say that your vendor’s price file includes pricing for a Package Quantity of 1 for the light bulb. Now that you can specify that the Vendor Package Quantity is for 1 bulb, instead of 10 bulbs, the formula for calculating the price per bulb will be as follows:
- The Vendor Price is $10
- The Vendor Package Quantity is "1”.
- For estimating purposes, the Vendor Price will be divided by the Package Quantity to determine the price per each light bulb in the box.
- $10 / 1 = $10 per light bulb.
- Without this new feature, the price would have been calculated incorrectly per the following formula:
- The Vendor Price is $10
- The Item’s Pricing Unit of Measure is "Per Box”.
- The Item’s Package Quantity is "10”.
- For estimating purposes, the Vendor Price will be divided by the Package Quantity to determine the price per each light bulb in the box.
- $10 / 10 = $1 per light bulb.
We have revised the Vendor Price Update file process to use both Tab Delimited and CSV (Comma Separated Values) formatted files. (View)
- The process is designed to automatically detect the correct format, but you can still manually select the format as needed.
We have added a new Vendor Price Update Analysis feature to the Vendor Price Update from File screen. This new feature provides you will a method to keep on top of your vendor pricing. You can sort by the % Of Change column and identify price increases that you need to discuss with your vendor. (View)
- Select the Vendor.
- Select the Price Update file.
- Click the "Read Prices” button. (View)
- The Vendor Price Update Analysis screen will open displaying the following sortable columns.
- UPC
- Description
- UOM
- New Price (From price file)
- Current Price (Item’s current vendor price)
- Difference between the New Price and Current Price
- % Of change
- Analyze the update and if all looks good, click the "Update Prices” button.
We have revised the Vendor Price File process to automatically deal with certain formatting issues.
Version 5.6 Release Notes
Enabled the item editor's Package Quantity when calculating an estimate's material pricing. (View)
- The price for many UPC numbers are for a package that contain multiple items.
- For example, a UPC number might be for a case of 6 light bulbs.
- The UPC's material price will be divided by the package quantity to determine the price for each item in the package.
- This is the material cost that will be used in the estimate.
- If an item's pricing is based on the standard per 100, or the per 1,000 pricing method, you can enter the item's package quantity.
- This will not effect the price calculation of dividing the price by 100 or 1,000.
- This information will only be used in the material screen to alert you that the item has a minimum order quantity.
Added a Package Quantity column to the material screen. (View)
- The price for many UPC numbers are for a package that contain multiple items.
- If the package quantity is greater than 1, you will receive a notice informing you how many items you must order to satisfy the minimum order requirement.
- Clicking the warning icon will automatically order the correct amount based on your bid quantity.
We have started adding items to TurboCloud's master database using customer's vendor price update files. (View)
- We're doing this so that every user's database will include all of the items that they purchase from their vendors.
- When we add items from a vendor price update file, the process adds the vendor's name to the item editor for both new and existing items.
- The material price will be zero until you run a price update file for that vendor.
- Our next update will include a vendor filter in TurboCloud.
- This will filter the items in TurboCloud so that only items that include the selected vendor are displayed.
- This will make it easy for you to do mass substitutions for assemblies that include items that your vendor does not carry.
- Everyone can recieve these new items that have designated vendors.
- Each item can have numerous vendors attached to it.
- This will allow you to see which items different vendors carry.
We have been approaching many vendors in an attempt to get them to provide you with vendor price update files
- Some vendors were not able to provide the 11 digit UPC numbers that we used to require.
- We have added a new feature that trims or adds digits to their UPC numbers as needed.
Revised assemblies to use the correct pricing for items that have a package quantity.
Added many new Unit of Measure designations that might be used in vendor price update files.
Revised the TurboCloud Refresh process to adjust pricing in case your local item has a different package quantity than what is in the cloud master.
Version 5.5 Release Notes
Highlights
- Revised the look and feel of the software’s User Interface. (View)
- Revised the look and layout of the documents.
- Added Item and Assembly Images to the documents.
- This allows you to show your customers pictures of what is included in your proposal.
-
Revised Item Editor.
-
Vendor Price Tab.
- This is an incredibly cool new feature. The Default Price Source for each item will automatically be used in your estimates and material screens. An estimate’s items will automatically contain a mix of List Price, TurboBid Price, Default Vendor Price or the Lowest Cost Vendor!
- Users can select to use their own images.
-
Vendor Price Tab.
- Revised Assembly Editor.
- Users can select to use their own images.
- Added a new Material Screen for Viewing Material and Creating Purchase Orders for your vendors. (View)
- The new material screen Displays Labor Hours for Each Job Phase.
- Revised the Material Vendor Price Update by File feature to update prices in mere minutes.
- Add Unlimited Material Vendors to each item.
- Removed the Software Upgrade and Support Plan and TurboCloud subscription requirements to view images in TurboCloud’s grid view.
More…. Interested in trying a shiny new version? Don’t forget to Renew Your TurboBid Software Upgrade & Support Plan! Renew now.
- New look and feel to software
- Revised document (Reports) designs
- Revised Item Editor
- Manage Vendors (View)
- Revised Assembly Editor (View)
- New Material Screen (View)
- TurboCloud (View)
- Revised the Bid Price Data Tab
- Material Take-Off Tab
- Revised Employee Wizard
- Revised Setup Wizard
- TurboBid Ribbon
- Edit > Program Options Menu
- Bugs Fixed
New look and feel to software
-
Fresh looking Graphical User Interface. (View)
Revised document (Reports) designs
-
Revised the Documents (Reports) tab. (View)
-
Format Documents section.
-
Added a General Options button.
-
This is used to select the Documents Footer. The footer has been revised to display a message at the bottom of the last page. Certain information in this location is required by law in some states.
-
Select the location of your Company Logo.
-
-
Added a Quote & Option Text button. This was moved from the Bid Price > Overhead, Profit and Misc. Adjustments Tab.
-
Added a Combine Multiple Estimates button. This was moved from the Bid Price > Overhead, Profit and Misc. Adjustments Tab.
-
-
Manage Documents section.
-
Added a Create Purchase Order button. This opens the new Purchase Order Settings screen that is used to Create Material Purchase Orders.
-
-
-
Revised all of the Documents (Reports) to include a fresh looking color scheme. You can select to display Item and Assembly Pictures in the Documents. This allows you to show your customers exactly what they’re getting.
-
By Category - Per Tab (View)
-
By Category - Tabs 1 and 2 (View)
-
By Column - Per Tab (View)
-
By Column - Tabs 1 and 2 (View)
-
Tab 2 - Add / Delete (View)
-
Bid Price by Phase (View)
-
Work Order (View)
-
Invoice (View)
-
Options Price List (View)
-
Formal Proposal (View)
-
Take-Off Analytical Details (View)
-
Purchase Order (View PO Settings) (View Purchase Order)
-
Flat Rate Price Book (View)
-
-
Your Company Name, Address, Phone #, and License # displayed at top of documents. The information is added from the Setup Wizard. This is required by law in some states.
-
Clearly defined Customer Information section at the top of the documents. This information is added from the Customer Info tab.
-
Customer’s Company Name (If applicable).
-
Customer Name.
-
Address.
-
Phone #.
-
Email Address.
-
-
Clearly defined Project Information sections at the top of documents. This information is added from the Project Info tab.
-
Project Name.
-
Project Contact.
-
Project Address.
-
Project Contact’s Phone #.
-
Project Contact’s Email Address.
-
-
Renamed Reports.
-
Renamed "Flat Rate Price Quote: With Quantities” to "Work Order”. "Work Order” is displayed in the top right corner of the document.
-
Renamed "Flat Rate Price Quote: No Quantities” to "Options Price List”. "Options Price List” is displayed in the top right corner of the document. This document is intended to show your customers items that they might want to add to their project. Upselling has a tremendous effect on profit margins.
-
-
Added the ability to Add Sales Tax to the Following Documents. This is required by law in some states.
-
Bid Price by Phase document.
-
Work Order document.
-
-
Added a New Footer Message to the last page. The footer can contain whatever message you need to display. This is required by law in some states.
-
Your Company Information that is displayed in your Formal Proposal can be changed for a specific project from the Format Proposal Screen.
-
The Old Material List Report has been replaced with a New Purchase Order Document. (View PO Settings) (View Purchase Order)
-
Displays the Vendor’s Information.
-
Displays the Project Information.
-
Displays the Delivery Information.
-
Displays all of the items that are to be ordered for the Selected Vendor.
-
-
The Column Headings in the Take-Off Tab are displayed in many of the documents. The reports were revised to allow the Column Headings to wrap up to two lines. This is especially helpful to display descriptions for service work.
Revised Item Editor
-
Video Tutorials
-
Overview Tab (View)
-
Multiple documents are displayed beneath the Item’s Image (Catalog, Instructions, Spec Sheet, etc.).
-
A large image of the item is displayed.
-
Assign Your Own Company ID # to items. (View)
-
Price Details. (View)
-
List Price (Trade) and TurboBid Price (Target) will always be displayed.
-
If the TurboBid Price is set as the Item’s Default Price Source.
-
An * will be displayed before TurboBid Price. The * indicated that it is the Default Price Source.
-
The TurboBid Price name is a link that will take you to the Default Price Source settings.
-
-
If a Vendor has been set as the Item’s Default Price Source.
-
A new row will be displayed beneath the TurboBid Price, and an * will be displayed before the Name of the Vendor. The * indicated that it is the Default Price Source.
-
The Vendor Name is a link that will take you to the Default Price Source settings.
-
-
-
New Pricing Unit of Measures. (View)
-
Per: Assembly, Bundle, Bag, Bulk Pack, Box, Case, Carton, Coil, Dozen, Foot, Gallon, 100 Linear Feet, Inch, Jar, Jug, Kit, Pound, Meter, Pail, Piece, Pint, Quart, Rod, Reel, Spool, Yard.
-
-
Added a Standard Package Quantity. (View)
-
Even though an item might have a Per Each unit of measure, the item might be priced for a case of 12 bulbs, or a jar of 50 anchors. The new Standard Packaging Quantity is for these situations. Enter the quantity of items that are in the Per Each package price, and your estimates will use the correct price for each individual item in the package.
-
-
Labor Details. Select one of the following. (View)
-
TurboBid Labor Unit.
-
Use Global Adjustment (x.xx%)
-
Custom Labor Unit
-
-
Change Item’s Image. (View)
-
Three icons have been added to the top left of the image.
-
Select Image File.
-
Use this to select a new image for the Item. File Explorer will open and you simply browse to and select the image you want to use.
-
-
Select Image from Image Catalog.
-
This will open your Image Catalog. This only includes Images that you have added. Select the Image that you want to use for the Item.
-
-
Clear Image.
-
This will Clear any Image that you had previously selected to use. Once you Clear an Image, the Default TurboBid Image will be displayed.
-
-
-
-
-
Pricing Details Tab (View)
-
You can now assign an Unlimited Number of Material Vendors to an item. (View)
-
You can select one of the following Default Price Sources for each item in your database. (View)
-
List Price.
-
TurboBid Price.
-
Lowest Vendor Price.
-
Default Vendor.
-
-
Added a Vendor SKU # for vendors who use an SKU # instead of UPC # (Home Depot). (View)
-
Added a Manage Vendors section where you can manage all of your vendor’s information. (View)
-
-
Descriptions Tab (View)
-
Added a Catalog Description.
-
The Catalog Description will be a longer, more detailed description of the item.
-
-
Added a Quantity Take-Off Description.
-
By default, the documents will use the Item’s Description. If you want to use a different description, enter it into the Quantity Take-Off Description.
-
-
-
Specifications Tab (View)
-
Added a Properties Section that will be used to define what items are displayed in TurboCloud. This will allow you to quickly display items with Wiring Properties such as EMT, Romex, MC, PVC, etc., or to display only White devices. While properties are in this version, the new filter system will be available in the next version, which should be released in about a month.
-
Properties will be grouped into categories such as Manufacturer, Brand, Series, Color, Wire Type, Material, Type, Size, etc.
-
All Properties that are included in the selected TurboCloud folder will be displayed on the left side of TurboCloud.
-
Each Property will be displayed with a checkbox.
-
Checking a Property checkbox will cause all items with that property to be displayed.
-
-
Added a Specifications section that will be for informational purposes only and will not be used for filtering.
-
-
Other Option Tab (View)
-
This is where you select Applicable Options for the item.
-
Manage Vendors (View)
-
Added the ability to Manage Your Material Vendors.
-
Create and manage an unlimited number of vendors.
-
Your vendors information will displayed in your Vendor Purchase Orders.
Revised Assembly Editor (View)
-
Video Tutorials
-
Added a Company ID field. (View)
-
This can be used to add your accounting system’s ID number.
-
-
Each Item will display the price and name of the selected Default Price Source. (View)
-
List Price.
-
TurboBid Price.
-
Lowest Vendor.
-
Default Vendor.
-
-
Each Item will display the name of the Lowest Cost Vendor. (View)
-
Added a new method for Replacing an Item in an Assembly. (View)
-
Click the Add Item to Assembly icon in the top left section of the editor.
-
The view will switch to TurboCloud’s Items Tab.
-
A "Drop Item Here” target will appear floating over the Item Grid in TurboCloud.
-
You can Drag and Drop an Item from the Folder Tree or from the Image Grid onto the Target.
-
You can select to Replace the Item in all Other Assemblies.
-
-
-
Added a new method for Replacing an Item in an Assembly. (View)
-
Select the Item in the assembly that you want to replace with a different item.
-
Select the Item in the Assembly and click the Replace Selected Item icon in the top left section of the editor.
-
Or Right click on an Item within the assembly and select Replace.
-
-
The view will switch to TurboCloud’s Items Tab.
-
The Item that you have selected to replace will be expanded and highlighted in the Item Tree. Typically, the Item you want to use to Replace the selected Item will be in the same area of the Item Tree.
-
A "Drop Item Here” target will appear floating over the Item Grid in TurboCloud.
-
You can Drag and Drop an Item from the Folder Tree or from the Image Grid onto the Target.
-
You can select to Replace the Item in all Other Assemblies.
-
-
-
Change Assembly’s Image. (View)
-
Three icons have been added to the top left of the image.
-
Select Image File.
-
Use this to select a new image for the Assembly. File Explorer will open and you simply browse to and select the image you want to use.
-
-
Select Image from Image Catalog.
-
This will open your Image Catalog. This only includes Images that you have added. Select the Image that you want to use for the Assembly.
-
-
Clear Image.
-
This will Clear any Image that you had previously selected to use. Once you Clear an Image, the Default TurboBid Image will be displayed.
-
-
-
New Material Screen (View)
The new Material Screen has several purposes.
-
Video Tutorials
-
View the Material in your Estimates.
-
Group the Material Screen by. (View)
-
Create Separate Order Groups for the Material in your Estimates. (View)
-
You can create Order Groups for each Take-Off Tab.
-
You can create Order Groups for Combined Take-Off Tabs.
-
-
Edit the Material in your Order Groups. (View)
-
Change the Order Quantity to account for minimum order size.
-
You can select to Add the Additional Cost of the extra material ordered to the estimate.
-
If the quantity of an item is revised in the Take-Off tab, the material screen will revert back to displaying the Order Quantity with the Bid Quantity.
-
-
Change the Order Quantity if you have the material in your inventory.
-
Replace an Item with a Different Item. (View)
-
Right-click on an Item and select Replace.
-
You can select to replace the Item with a different Item in every Assembly in the Database.
-
You can select to replace the Item with a different Item in just the Assemblies in the Estimate.
-
All Assemblies that include the Item in the Estimate will be displayed and you can select which Assemblies to replace the Item.
-
-
You will be taken to the Item's tab of TurboCloud.
-
A "Drop Item Here” target will appear floating over the Items in TurboCloud.
-
You can Drag and Drop an Item from the Folder Tree or from the Image Grid.
-
-
-
Change an Item’s Material’s Price Source to. (View)
-
List Price.
-
TurboBid Price.
-
A Different Vendor’s Price.
-
-
Reset the Price Source for all Items. (View)
-
Select to reset every Item’s Price Source to.
-
Item Default.
-
List Price.
-
TurboBid Price.
-
The Item's Default Vendor.
-
-
-
-
Create Purchase Orders. (View PO Settings) (View Purchase Order)
-
Added a Purchase Order feature that will allow you to generate Material Purchase Orders.
-
The Purchase Order Settings screen will prompt you to select the Material to include in the Purchase Order.
-
Estimate Name.
-
Order Group (Combination of Take-Off tabs).
-
Price Source.
-
A Default Vendor Name.
-
List / TurboBid Price.
-
You’ll be able to select to order the List or TurboBid Priced Items from any of the Vendors that you have created. While this will use the List or TurboBid Price, it will generate a Purchase Order with the Vendor’s information.
-
You can also select to use no Vendor information in the Purchase Order.
-
-
Job Phase.
-
All Job Phases in the Estimate will be displayed. You’ll select which Job Phases to include in the Purchase Order.
-
-
-
-
The Purchase Order Settings screen will prompt you to select the order information your Vendor will need.
-
Purchase Order #. This will allow you to trach the Purchase Order in your accounting system.
-
Delivery Date.
-
Deliver To.
-
Select to deliver the material to the Jobsite. The Jobsite information will automatically be filled in from the Project Info tab.
-
Select to deliver the material to your Companies Shop. The Shop information will automatically be filled in from the Setup Wizard.
-
Select to deliver the material to a different location.
-
You will enter the Delivery Address, Attention To, and Phone #.
-
-
Note. You can enter a Note with specific instructions regarding the delivery.
-
-
-
The Purchase Order Settings screen will allow you to include Vendor SKU #, Material Prices, and Item Pictures in the Purchase Order.
-
TurboCloud (View)
-
Removed the requirement that you must have an active Maintenance Plan and TurboCloud Subscription requirements to view the images in TurboCloud’s Grid View.
-
You can set your Items and Assemblies to use your own images. This is important since all of TurboBid’s Bid Package Documents display images. (View)
-
Simplified the Vendor Price Update by File layout. (View)
-
Added a button titled "Image Gallery” to the ribbon. (View)
-
The Image Gallery is a folder on your computer that you have selected to keep your images in.
-
-
Added a button titled "Update Item Prices” to the ribbon. The button contains the follow price update features. (View)
-
Update List (Trade) and TurboBid (Target) Pricing with TurboCloud.
-
Update List (Trade) and TurboBid (Target) Pricing with NetPricer.
-
Update Vendor Pricing with TurboPricer.
-
Update Vendor Pricing with a Vendor’s Price File.
-
-
Added a button titled "Manage Vendors” to the ribbon. This is used to manage Your material vendors.
-
Create an unlimited number of vendors. (View Button) (View Manage Vendors Screen)
-
Edit existing vendor names, addresses, attention to, email, and/or phone numbers.
-
Enter NetPricer or TurboPricer Information.
-
-
Reduced the size of the Grid’s Description Font, which allows the description to wrap 3 rows.
-
Removed the Item’s UPC Number from the Grid to save space.
-
The price displayed in the Grid represents the Item’s Default Price Source. (View)
-
Added a Copy Image icon to the grid that allows you to paste the image to another Item. (View)
-
Reduced the size of each Grid so that more Grids can be displayed.
Revised the Bid Price Data Tab
Overhead, Profit and Misc. Adjustments Tab (View)
-
Moved the Combine Multiple Estimates Link to the revised Documents Tab.
-
Moved the Quote & Option Text Link to the revised Documents Tab.
Direct Cost Detail Tab
-
Added a row to display the Additional Material Ordered cost. The new Material Screen allows you to order additional material due to minimum package quantities, and then select to add the cost of the additional material to the estimate. (View)
-
When an Option Tab is selected in the Take-Off dropdown, neither the Tab 2 Section or the Tab 1 and 2 Section is displayed. (View)
Bid Price Detail Tab
-
When an Option Tab is selected in the Take-Off dropdown, the Tab 2 column, Combined Total column, or the % of Cost column is no longer displayed. (View)
Material Take-Off Tab
-
Moved Tab 1, Tab 2, and the Option tabs to the top for better visibility. (View)
-
Added a View Estimated Material button to the ribbon.
-
This opens the Material Screen for the Estimate. (View)
-
-
Revised the Subcategory and Description layout so that there are no grey rows running across the screen for each Subcategory. The only grey rows running across the screen are for the Category rows. Usability has been greatly enhanced. (View)
-
The Column Heading Names wrap text up to 3 rows. (View)
-
The columns have a maximum width before they start to wrap.
-
This is a great improvement for descriptions of Service Work.
Revised Employee Wizard
While the Employee Wizard still walks you through each step, you can now go to any tab in the Wizard without using the Next button.
Revised Setup Wizard
While the Setup Wizard still walks you through each step, you can now go to any tab in the Wizard without using the Next button.
TurboBid Ribbon
If a Project is open, the following buttons appear in the right side of the TurboBid Ribbon. (View)
-
Purchase Oder: This opens the new Material Screen or existing Material Purchase Orders.
-
Project Notes.
-
Check List.
Edit > Program Options Menu
-
The Program Options Screen no longer exists.
-
The NetPricer tab settings are included in the new Manage Vendors button that is in TurboCloud’s ribbon.
-
The Labor Unit Adjustment tab settings are included in the Adjust Labor Units button that is in TurboCloud’s ribbon.
-
The Report Logo Options tab settings are included in the Setup Wizard button that is in TurboBid’s ribbon.
-
The Default Take-Off Tab Names tab settings are included in the Material Take-Off tab’s ribbon, within the Tab Names dropdown button.
-
The Vendor Names tab settings are included in the new Manage Vendors button that is in TurboCloud’s ribbon.
-
The TurboPricer tab settings are included in the new Manage Vendors button that is in TurboCloud’s ribbon.
Bugs Fixed
-
Direct Cost line items will not be displayed in the either the Work Order or Invoice documents if they have a zero price.
-
You can move any of the Community Added Assemblies into your other root folders without them moving back to the Community Added Assemblies folder during a TurboCloud Refresh.
-
Added tooltips to explain the different folders in TurboCloud.
-
The Bid Price by Phase report no longer display empty rows if there are less than 5 payout phases.
-
If a Main Pricing Description and/or Option Pricing Description is not selected for the Bid Price by Phase document, the informational text is no longer displayed in the document.
TurboBid 5.2.9.0
New Overhead Rate Per Hour Calculator (Video Tutorial)
- The ability to accurately account for your company's overhead expenses in your estimates is of the utmost importance. If you add too much overhead to your estimates, your bid price will be higher than it should be, and you will not be awarded the job. If you add too little overhead to your estimates, your bid price will be lower than it should be, and you will not make the expected profit.
- Your company overhead represents the expenses that you incur to run your company. It has nothing to do with your field employees, material for your jobs, or any direct job expenses. Overhead consists of advertising expenses, financial expenses, insurance expenses, IT expenses, legal expenses, physical business location expenses, office expenses, office utilities, office employees, taxes, vehicles, etc.
- The best way to accurately calculate how much to add to your estimates for your overhead expenses, is to use an overhead rate per hour value.
- Some contractors use a set percentage of the estimated prime cost for calculating their overhead expenses. The problem with this method is that the estimated prime cost includes all direct job expenses. Think of this scenario. The estimator has selected to calculate the estimate's overhead cost by using 10% of the estimated prime cost. Let's suppose that this estimate included a $50,000 emergency generator system. This method will have added $5,000 to the overhead expenses, when in fact the emergency generator system did not cause the company's overhead costs to increase one penny. This estimate will be $5,000 higher than it should be.
- The Overhead Rate Per Hour is calculated by dividing your true overhead expenses by the total number of hours your field employees will be working on your job sites. If you're trying to keep two employees employed for 1,968 hours per year, you will need to win estimates that will keep your guys busy for 3,936 for the year.
- By accurately identifying and accounting for all of your company's overhead expenses, and then dividing that amount by your employee's total job site hours, you will know exactly how much overhead to add to your estimates per hour.
- It doesn't matter what size your company is. This is simply business 101, and will determine the financial success of your company.
- Another great feature of the calculator is the Billable Rate section. Simply enter the amount of profit that you would like to make on your employee's for time and material work, and it will calculate how much you should be charging your customers per hour for each employee. An employee's billable rate per hour is calculated by adding together each employee's hourly pay rate, hourly burden, hourly overhead, and the selected profit. If you don't know your employee's burden costs, or your company's overhead costs, there is no way that you can calculate how much profit you're making on your billable rate per hour. The sad truth is that you could actually be losing money.
- Easily add any employee in your employee list to the calculator.
- TurboBid's Employee and Burden Wizards walk you through the process of entering data in order to accurately calculate each employee's burden costs, as well as hour many hours each employee will be working on your job sites.
- All required employee data is automatically added to the calculator.
- Employee data revisions are updated in the calculator in real time.
- Every tab displays your overhead summary values. The values are updated in real-time as data is entered, allowing you to immediately see the impact of new entries.
- Select to automatically use the calculator's Overhead Rate Per Hour in your estimates.
- Any changes to the calculator are automatically applied to your estimates.
Figure 1: Select Employees

Figure 2: Select Overhead Expenses

Figure 3: Summary Values are Updated in Real-Time as Data is Entered into the Calculator

Figure 4: Calculate Your Employee's Billable Rate Per Hour for Time and Material Work

TurboBid 5.2.6.0
Formal Proposal
- Descriptions for items that are in the Take-Off tab are no longer being displayed in the formal proposal.
TurboCloud Assembly Grid View
- We have revised the old assembly tree view into a grid view to make it easier to find what you’re looking for. The new grid view displays images for the assemblies and the assembly folders.
- We will be revising the reports in the future to display images. This will be a great feature for service and remodel quotes.
- Each assembly image in the grid includes an "Add to Estimate†button.
Figure 1: New Assembly Grid View.

TurboCloud Search Feature
- We have improved TurboBid’s search feature to make it easier to find what you’re looking for. Rather than simply displaying a list of search results, the new search feature is located within the Item and Assembly grid views.
- Search results are displayed in both the folder tree and the image grid, allowing you to see exactly what you’re looking for.
- By default, only folders that contain search results will be displayed. However, you can display all the folders in the tree by clicking the "Show All†button. The non-result folders will display a different folder icon so that you can easily identify the search result folders.
- The search feature in the "Select Material†screen and the "Assembly Maintenance†screen will open to the new search feature.
Figure 2: New Search Feature.

TurboCloud Virtual Library
- In order to meet every estimator’s material needs, TurboBid’s database include hundreds of thousands of items and assemblies. This can be a lot of material to navigate through in order to find what you need.
- Since most users typically have a limited number of items and assemblies that they use on a regular basis, we have added a new database section titled "Virtual Libraryâ€.
- The Virtual Library allows you to create folders that contain links to existing items and assemblies. All existing items and assemblies can quickly be added to any folder in the virtual library.
Virtual Library Templates
- TurboBid’s Select Material screen includes the ability to save the material in an estimate as a template that can be loaded into future estimates.
- We have added a right click menu option for "Import Templateâ€. This allows you to import your previously created templates into your Virtual Library.
- The contents of all Virtual Library folders can be added to an estimate.
TurboCloud New Items Folder
- Our database admin team works closely with various supply houses. They provide us with material files that we use to import tens of thousands of new items into TurboBid’s database. These imported items include basic descriptions, manufacturer, UPC #, catalog # and pricing. Our database team tweaks the descriptions, add pictures, catalogs, and labor units as soon as possible. However, this process can take a considerable amount of time.
- Rather than making you wait for our admin team to finish, we are making these items available to you in the New Items folder.
- Once our admin team tweaks the descriptions, adds pictures, catalogs, and labor units, the items will be move into your Standard folder.
TurboBid 5.2.1.0
Revised the Item and Assembly folder tree
- Managing TurboBid's database is now easier than ever.
- Due to the complexity of the old folder tree, we have made a major revision so that there is only one type of folder. Now, all the folders are yellow, have no rules as to where they can be located, or what items/assemblies they can contain. The result is that it is now much easier to edit the database trees, and the speed of running a TurboCloud refresh/sync is ridiculously fast.

TurboBid 5.1.8.0
New Employee Icon and List
- The old "Labor and Burden" icon has been replaced with a new "Employee" icon.
- The new "Employee" icon opens a new multi tab screen that displays your Employees, Burden Groups, and burdens.
- The new employee list is highly detailed. It makes it simple to view everything about your employees, including all of their burdens.
- It is linked to and interacts with the new Employee Wizard
- It is linked to and interacts with the new Burden Wizard
- https://www.turbobid.net/EmployeeList.html
New Employee Wizard
- The old "Manpower Classification" screen has been replaced with a new "Employee Wizard".
- The new Employee Wizard is used to create new employees as well as maintain existing employees
- The Employee Wizard is very detailed and is in a simple to use step by step wizard format. It makes creating new employees really simple
- Employees can assigned to use a specific Burden Group that was created and maintained in the new Burden Group Wizard.
- If an employee is assigned to use a specific Burden Group, the Hourly Burden cost will automatically be calculated and assigned to the employee.
- https://www.turbobid.net/EmployeeWizard.html
New Burden Group Wizard
- The old "Burden Calculator" screen has been replaced with a new "Burden Group Wizard".
- The new Burden Group Wizard is used to create new Burden Groups as well as maintain existing Burden Groups.
- The Burden Group Wizard is very detailed and is in a simple to use step by step wizard format. While the old calculator could be a little confusing. this new wizard guides you through the process step by step.
- https://www.turbobid.net/BurdenWizard.html
Misc.
- Revised the report that displays the items in an estimate that have a zero price.
- Resolved an issue with renaming the take-off tabs.
TurboBid 5.1.7.3
New Database Maintenance Tools
- Added an Advanced Group Renaming tool that allows you to edit the description of items/assemblies, and the quantity take-off description and/or formal proposal text of assemblies for a selected folder. This includes all of the items/assemblies in all of the child folders of the selected parent folder. Rather than editing one at a time, this will give you the power to edit thousands of items/assemblies at a time if needed.
- https://www.turbobid.net/RenameTool.html
- Added a Group Assembly Item Manipulation tool that allows you to edit the items within all of the assemblies for a selected folder. This includes all of the assemblies in all of the child folders of the selected parent folder. You can replace items, add new items, and/or delete existing items. Rather than editing one assembly at a time, you will be able to edit thousands of assemblies at a time if needed.
- https://www.turbobid.net/AssemblyItemManipulationTool.html
Misc.
Revised the Project List to display the project value of Original status projects.TurboBid 5.1.6.0
Set-Up Wizard
- Added a setup wizard that is designed to walk you through the process of entering your default company information, overhead, profit, sales tax, and field employee information. A setup wizard icon was added to the top toolbar.
- https://www.turbobid.net/SetupWizard.html
Manpower Classifications
- Revised the manpower classification list to allow the deletion of existing manpower classifications.
Bid Package Documents
- Added company footer info to the footer of all bid package documents.
- Added Cell Phone and Email fields to the footer.
- Added an "Insert Company Name" feature that will insert a company name placeholder to the format proposal opening paragraph, inclusions and qualifications, and 2nd paragraph that will cause the default company name to automatically be inserted in the documents.
- If the Estimate Info tab is missing the blueprint date, latest revision date, or architect name, the formal proposal will automatically keep the appropriate reference out of the formal proposal.
- When selecting to generate the formal proposal, an optional prompt is displayed asking if you want to open the Format Formal Proposal screen.
- When selecting to generate the bid price by phase report, an optional prompt is displayed asking if you want to open the Format Bid Price screen.
- Revised the Flat Rate Price Book report to wrap the category heading lines if needed.
- Revised the Flat Rate Price Book report to remove the Regular Labor and Ceiling Labor text from the category headings.
TurboBid 5.1.3.0
Trial Mode
- Any available updates are automatically installed.
Log-In Screen
- A "Log me in automatically" checkbox has been added. This eliminates the need to log in every time you open TurboBid.
- A "Switch User" icon has been added to the toolbar. The icon opens the log in screen.
Project List
- In order to display a minimum screen size, the size of the screen is based on the contents.
- Alternate line shading has been added for better readability.
- The "Select a Status" dropdown selection automatically displays projects based on the dropdown selection.
Training Mode
- Includes more instructional messages where needed.
Video Player
- An auto play on/off button has been added.
- An "Exit Training Mode" button has been added.
Take-Off Tab
- Rows that do not represent an item or assembly cannot be selected.
- When a cell is clicked, the row's description and the column's heading is highlighted for easier cell identification.
- When you move your curser over a cell, the row description and column heading are highlighted. This allows quick identification of the cell without having to select a cell.
Assembly Maintenance Screen
- The item tree section is expanded to its maximum width based on the contents of the assembly.
- Alternate line shading has been added for better readability.
- Right clicking on an item selects the item and opens the right click menu.
TurboBid 5.1.1.1
Fixed Issues
- Long vendor names were not being displayed in the item maintenance screen.
- Fixed an issue with the Project Detail Report in networked databases.
- Certain items were not being displayed in certain reports.
- Allowed networked databases to use a custom address for Auto Back-Up.
- When deleting a folder of items in TurboCloud, certain items in the folder could not be deleted.
- The Take-Off tabs' templates have been revised to use the material Master ID number. Local ID numbers can change and make the original templates obsolete. Master ID numbers never change.
- Click here to download the revised assembly templates.
Modifications
- After adding new items to the Assembly Maintenance screen, the quantity cell is active so you can enter a quantity without selecting the item.
- Modified the Assembly Maintenance screen to allow 0.xx to be entered as a quantity.
- The report selection screen displays the first estimate and first take-off as default selections.
- The "Material" link in the "Direct Cost Detail" tab opens the material report for the selected take-off tab.
- The Take-Off tab's sort order now displays all of the material beneath each red category in alphabetical order.
TurboBid 5.1.0.5
Add Items to TurboBid's Take-Off Tab
- Items can now be added to the take-off spreadsheet.
- Items in the take-off spreadsheet are highlighted in a light blue color for easy differentiation from assemblies. (Figure 1)
- Double clicking an item in the spreadsheet will open the Item's Preview screen.
- Pressing the Ctrl key and double clicking an item in the spreadsheet will open the Item's Maintenance screen.
- Renamed the Take-Off tab's Select Assemblies button to Select Material.
- The Select Material screen now includes one tab for adding Items and one tab for adding Assemblies. (Figure 2)
Add Items and Assemblies to the Take-Off Tab's spreadsheet directly from TurboCloud
- Users can select a single Item, or multiple Items via Ctrl / Click, and select Add to Estimate from the right click menu. (Figure 3)
- The Items in the Image Grid View include a new Add to Estimate button. (Figure 4)
- Users can select a single Assembly, or multiple Assemblies via Ctrl / Click, and select Add to Estimate from the right click menu. (Figure 5)
- Users can right click on an item or assembly in the take-off spreadsheet and select Locate in Tree from the right click menu. (Figure 6)
Add Items and Assemblies to the Take-Off Tab's spreadsheet from "Load Template"
- The Load Template feature in the Select Material screen has been revised to include Items and Assemblies in the same template.
Revised the Take-Off Tab's Sort Order Procedure
(Figure 7)- Renamed the Take-Off tab's Take-Off Sort Order button to Material Order.
- The Material Order screen now allow users to easily drag/drop folders into the order they want them to appear in the take-off spreadsheet.
- Item folders are highlighted in a light blue color for easy differentiation from assembly folders.
- Each folder's Parent folder name is also displayed so that you can easily see the difference between Flat Rate Assemblies, Standard Assemblies, etc.
- Includes a Reset button that resets the folders back to an alphabetical sort order.
The Assembly Preview screen now displays an image of every item in the assembly.
(Figure 8)Misc.
- Added the word Assembly to the end of every assembly's Quantity Take-Off Description so that the various reports clearly differentiate between Items and Assemblies. TurboCloud's Refresh and Update local Assemblies process will revise these assemblies in your local. (Figure 9)
- Added a new Exclude from Quantity Take-Off Reports checkbox to the bottom of the Item Maintenance screen. (Figure 10)
- All of the Material folders were removed from TurboCloud's Master Assembly Database. TurboCloud's Refresh and Synchronize local Assembly folders process will move these folders to a new Under Admin Review folder in your local. You can delete all of these from your local as long as they have not been added to an estimate.
- Prior to running an update, as a safeguard, a backup copy of your database is automatically created. (Figure 11)
- The Item Maintenance screen has been slightly revised so that the entire screen is visible in smaller computer monitors.
Images
Figure 1: Items in the take-off spreadsheet are highlighted in a light blue color for easy differentiation from assemblies.

Figure 2: The Select Material screen now includes one tab for adding Items and one tab for adding Assemblies

Figure 3: Users can select a single Item, or multiple Items via Ctrl / Click, and select Add to Estimate from the right click menu

Figure 4: The Items in the Image Grid View include a new Add to Estimate button

Figure 5: Select a single Assembly, or multiple Assemblies via Ctrl / Click, and select Add to Estimate from the right click menu

Figure 6: Right click on an item or assembly in the take-off spreadsheet and select Locate in Tree from the right click menu

Figure 7: Revised the Take-Off Tab's Sort Order Procedure

Figure 8: The Assembly Preview screen has been revised

Figure 9: Added the word Assembly to the end of every assembly's Quantity Take-Off Description

Figure 10: Added a new Exclude from Quantity Take-Off Reports checkbox to the bottom of the Item Maintenance screen

Figure 11: Prior to running an update, as a safeguard, a backup copy of your database is automatically created

TurboBid 5.0.9.2
TurboBid:
|
TurboCloud:
- Removed virtual custom folders from the cloud master. These folders were intended to hold virtual copies linking to existing items and assemblies.
Misc:
- Fixed a couple of minor bugs that we found when doing random sequences in the folder tree that nobody would ever do. For example: Opening an assembly maintenance screen, making an edit, closing the maintenance screen and then double clicking on the assembly would generate an error message.
TurboBid 5.0.9.0
TurboCloud:
|
TurboCloud Refresh:
- If the "Display new items and assemblies after cloud synchronization completed" checkbox is checked, after the refresh, the cloud master tree will be expanded so that you can quickly view the new items and assemblies. If nothing new was added, the newest items/assemblies that were added during the previous refresh will be displayed.
TurboBid:
- Fixed an issue for computers with low memory. Previously, if a computer's memory was too low, if you updated an item's price, assemblies and estimates might not update correctly. This issue has been resolved.
- Improved the process of updating prices for assemblies and estimates. It is now 99% faster.
Price Update from File:
- Added "Trade/Target" to the "Update price from file" selection. This allows both to be updated at the same time.
- Added a prompt "Do you want to update the "xxxx" vendor pricing?" This will ensure that you have not accidentally selected the wrong vendor to update.
- When running a price update, a pre-check is performed to ensure that the price file includes the required data. If there is an issue, you will receive a notification of what needs to be corrected.
- After running a price update, the default exception report only displays items that were not updated in your active projects. After you close the report, a prompt will ask if you want to view all of the items in your database that were not updated.
TurboBid 5.0.8.0
Global Labor Unit Adjustment:

|
Items:
- When revising an item's price and/or labor unit, the time to update all associated assemblies has also been substantially improved upon.
- When adding new items from the cloud to the local database, the items will automatically reflect any default global labor unit adjustment you have selected.
- When creating new items, the items will automatically reflect any default global labor unit adjustment.
Videos:
- Fixed an issue with the video icon not opening the video player.
TurboCloud Grid View:
- Revised the item grid view container to only display the bottom tool bar when the curser is over it. It used to always be visible on the selected item and would hide the labor unit.
Take-Off Tab:
- Improved the performance when opening the take-off tab. Previously, the amount of time it took to open was greatly affected by the number of projects and estimates in the database, as well as how many assemblies were in the take-off. The take-off tab now opens within seconds regardless of these factors.
Bid Price Tab:
- Improved the performance when opening the bid price tab. The tab now opens within seconds.
Misc:
- Fixed an issue with creating new users in project security.
- Fixed an issue when clicking the Material link in the bid price tab.
Reports:
- Revised the report that displays the items in a project that are missing material pricing and/or labor units. Previously, the report displayed the same item multiple times if it was used in multiple assemblies. Now each item is only displayed once.
TurboBid 5.0.7.0
TurboCloud: (View Video)
Customer Info Tab:
Reports:
Bid Price Tab:
Price Update from file:
Manpower Burden Calculator:
|
TurboBid 5.0.5.0
TurboCloud:
|
| Receive a notification whenever new items and/or assemblies are available |

|
| One-click is all it takes to maintain your local database with TurboBid's cloud based master database |
 |
Take-Off Tab:
|
| The main assembly category is displayed once in black and each subcategory is displayed beneath it in red |
 |
Select Assemblies:
|
| Entire folders of assemblies can now be added to the take-off |

|
|
Select Assemblies Screen - Locate Assemblies and Create New Assemblies |
 |
Assembly Maintenance Screen:
|
| Double click on items to open the items' preview screen and quickly locate items in the tree |
 |
| Add items from within the assembly maintenance screen and quickly locate items in the tree |

|
Reports:
|
| Report font revised and Qty Take-Off reports only display main categories |
|
|

|


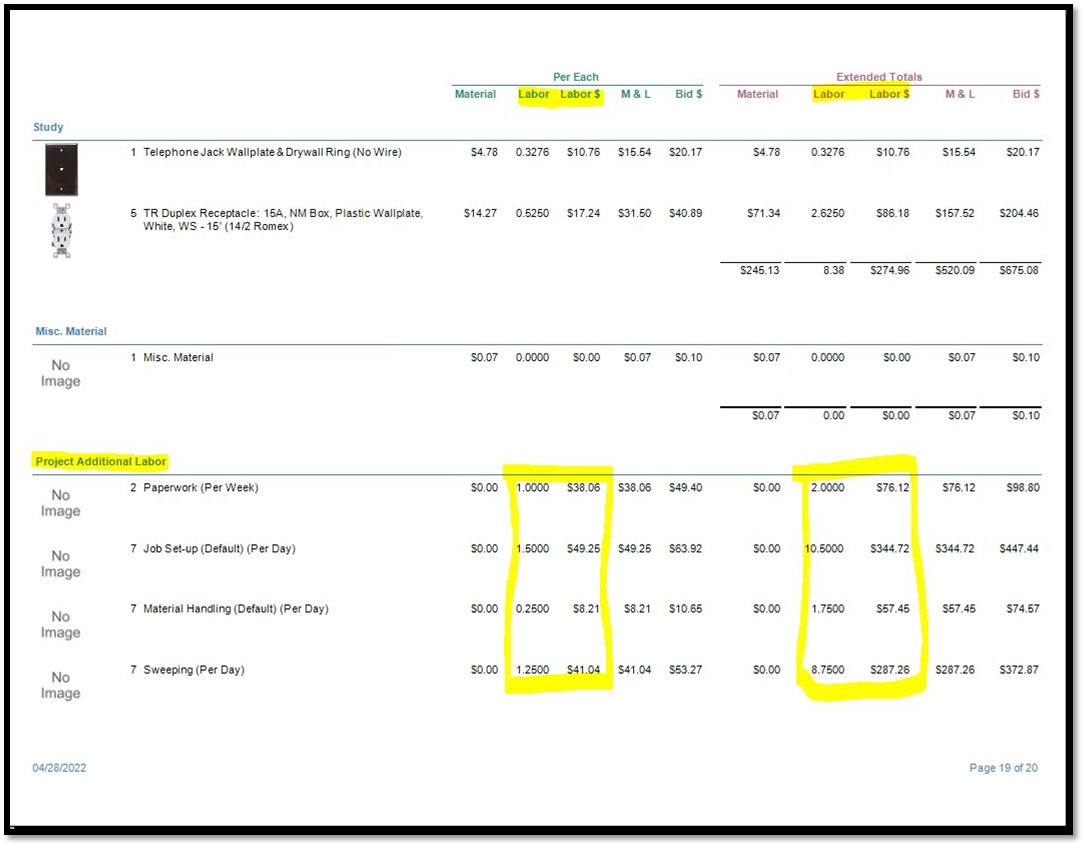
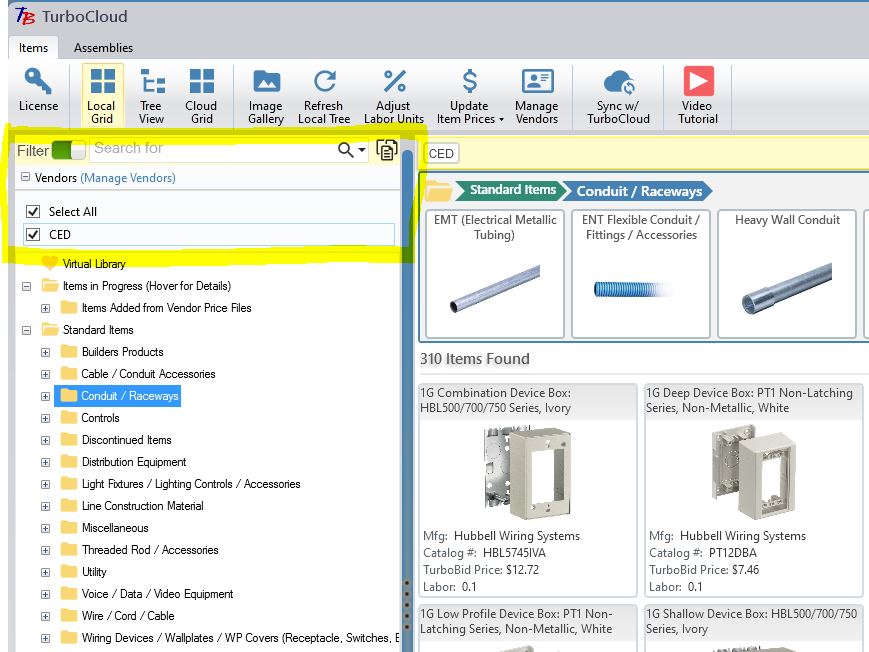
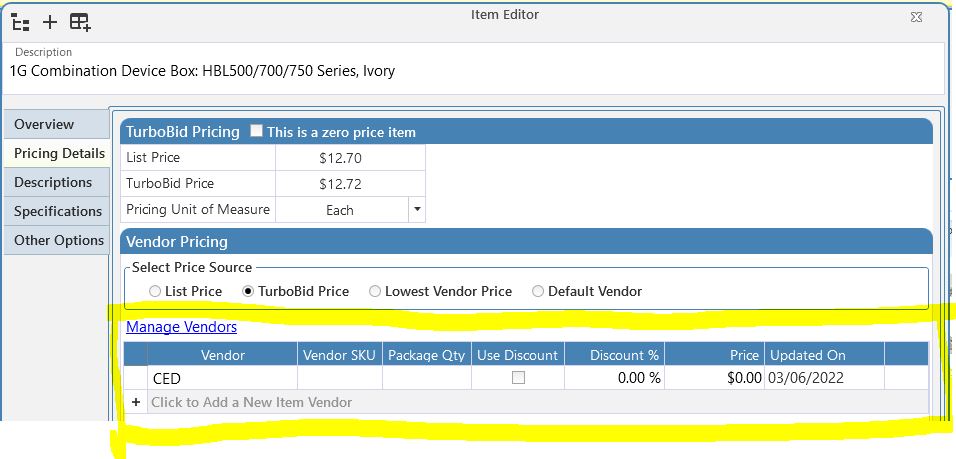
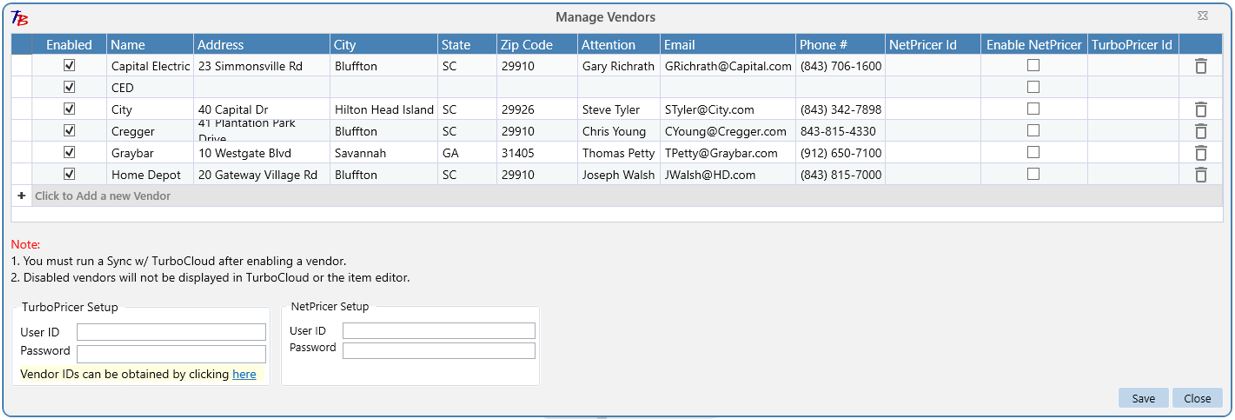
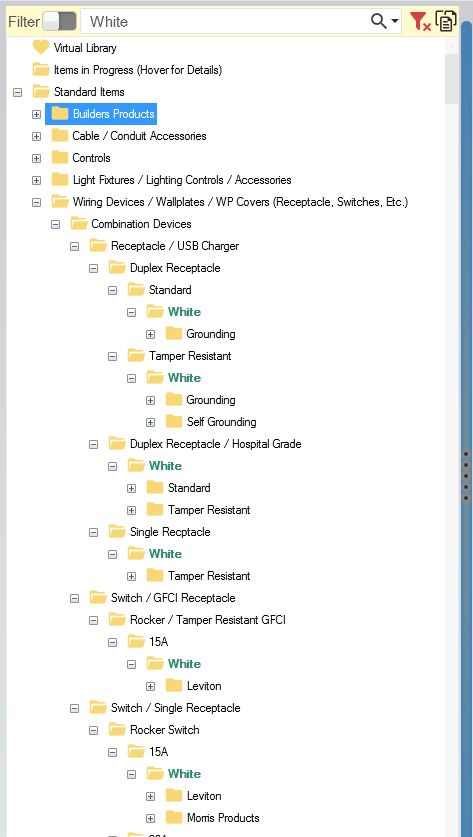
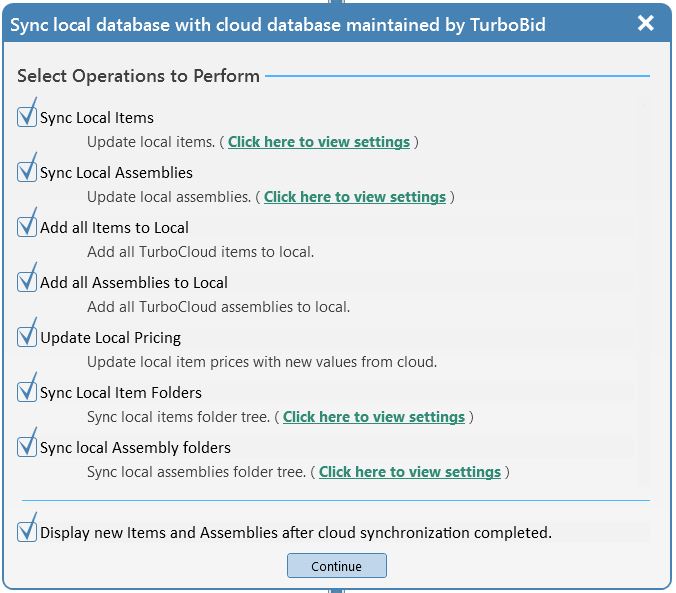
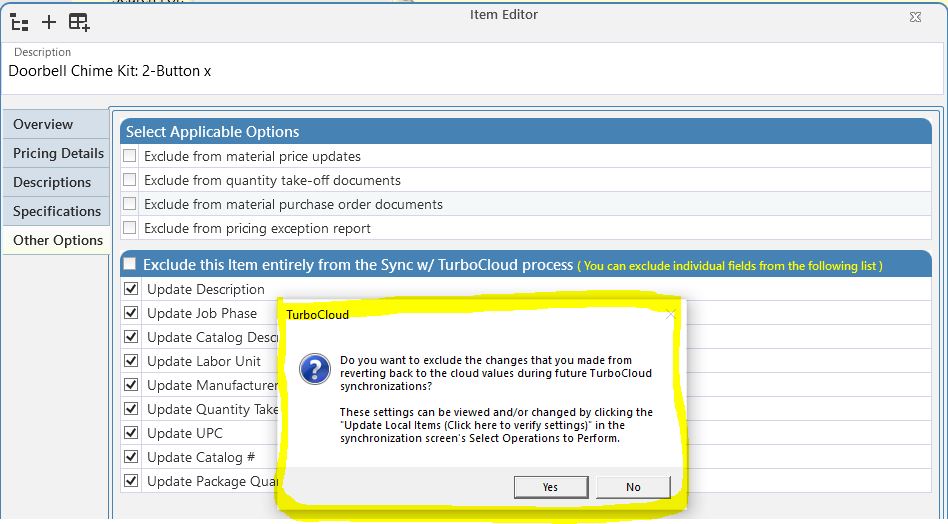
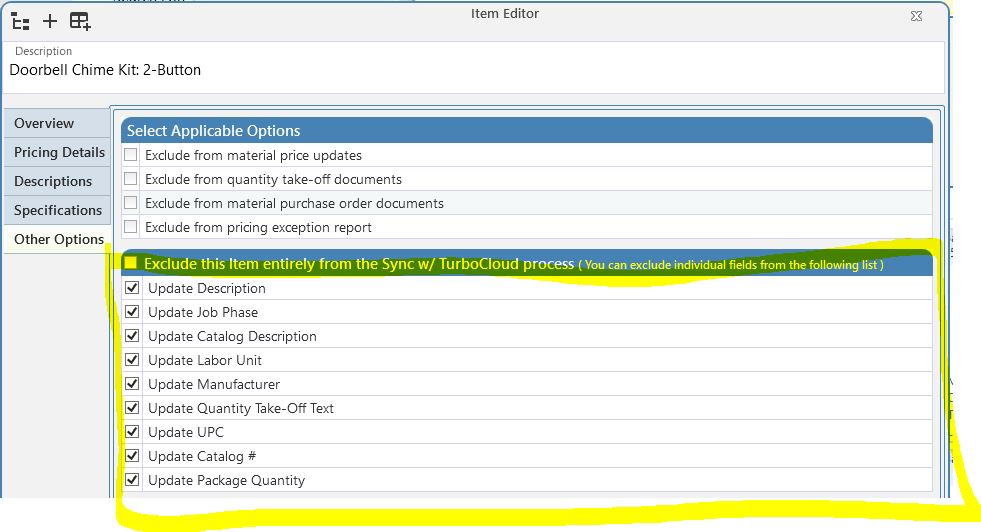
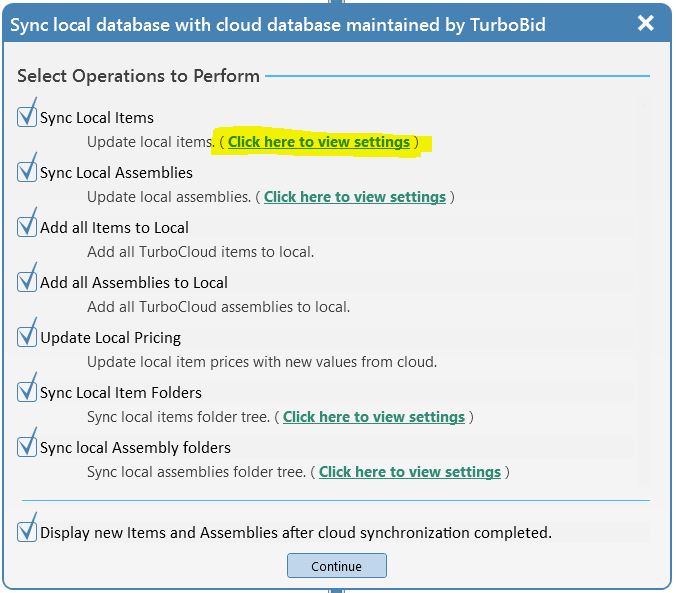
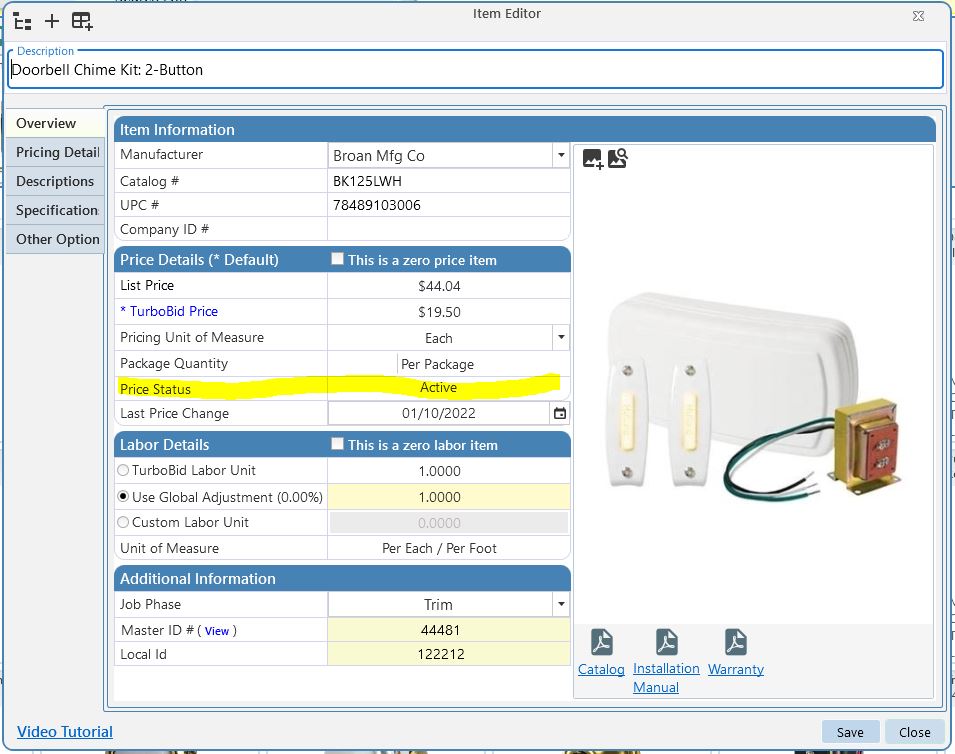
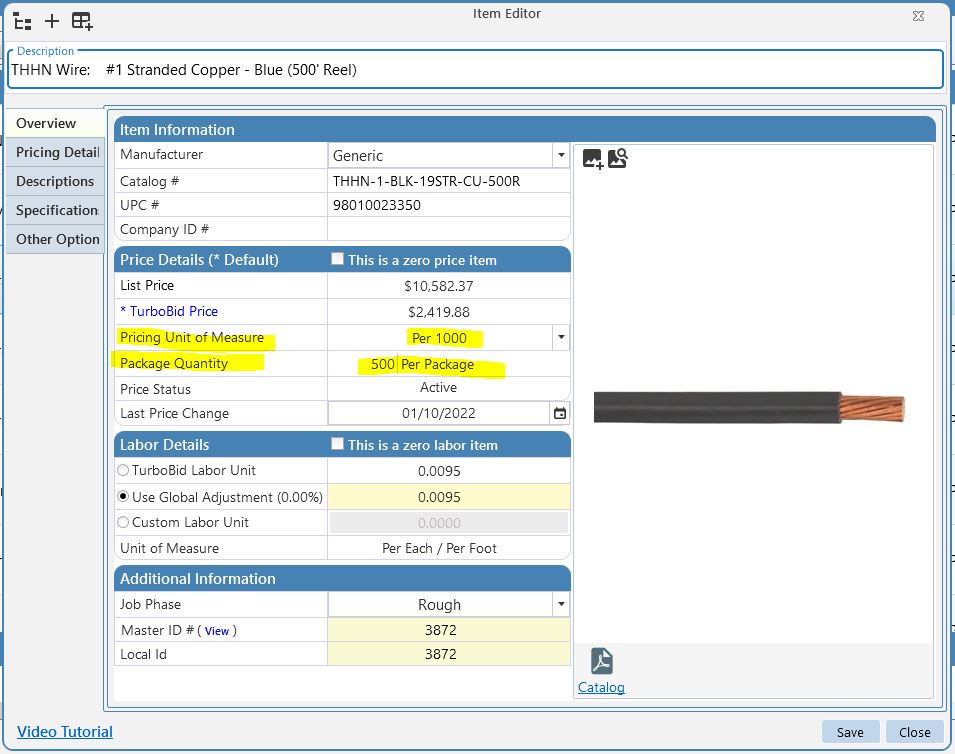
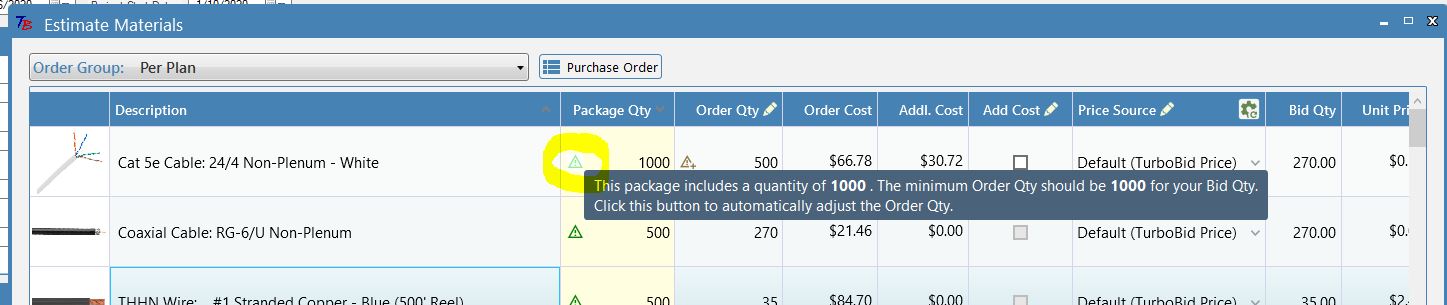
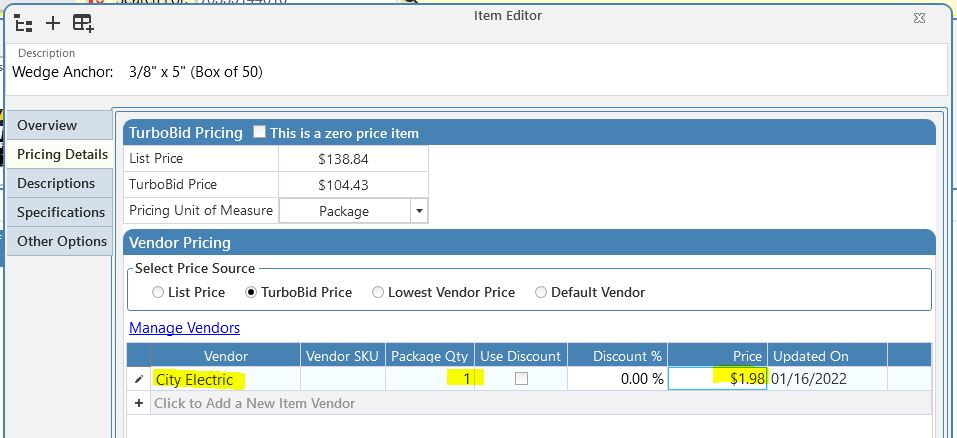
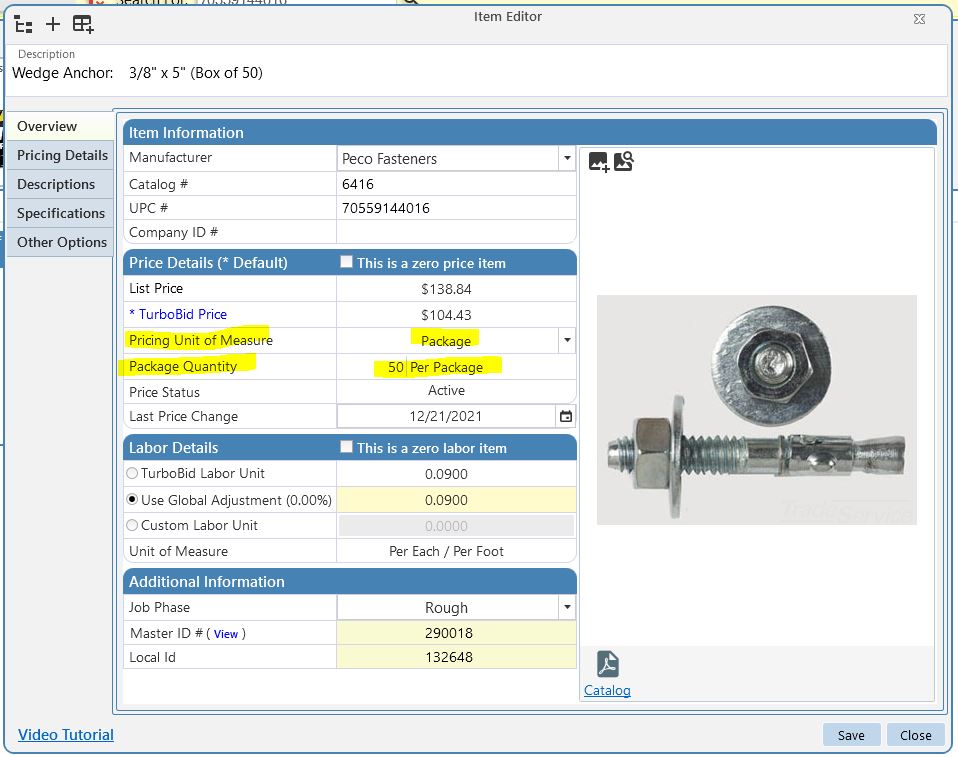
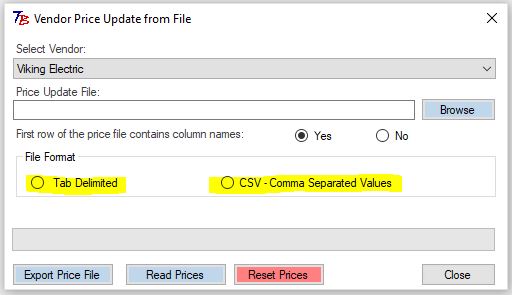
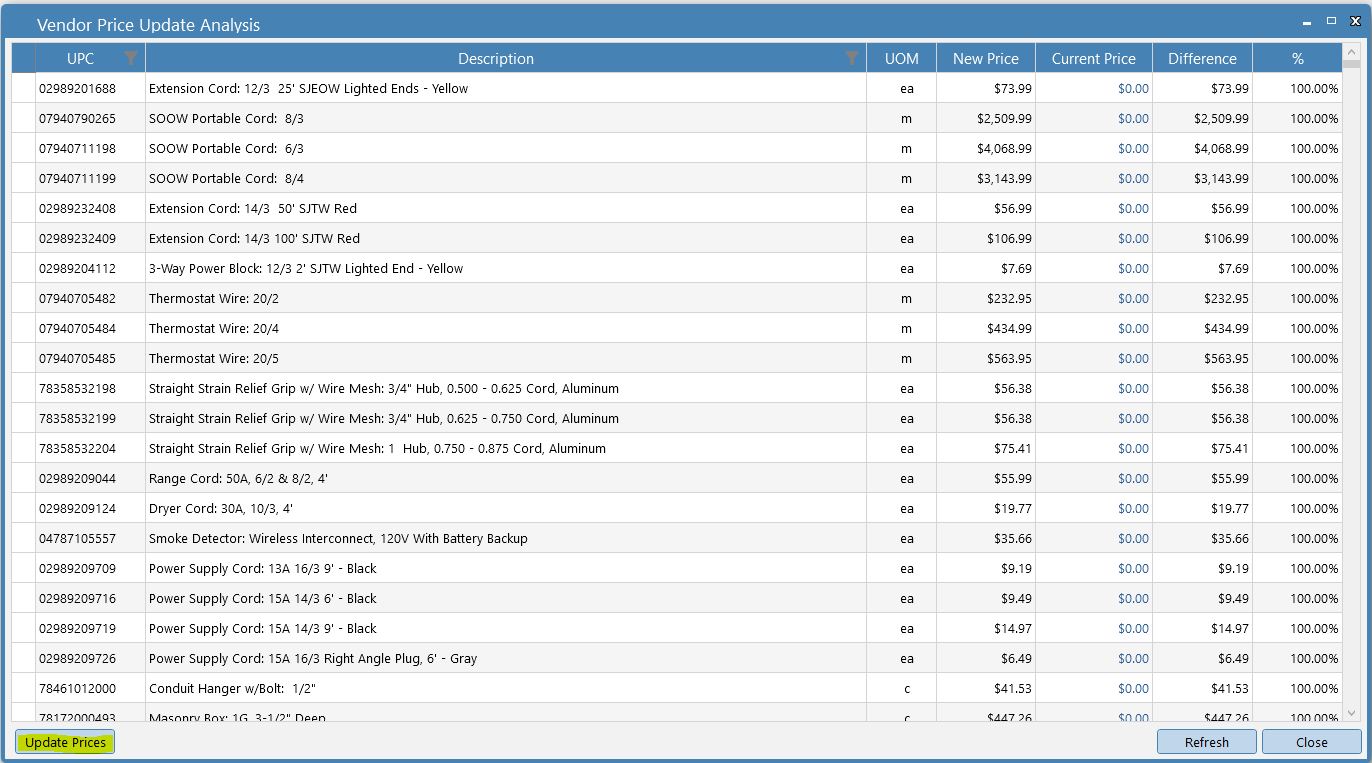
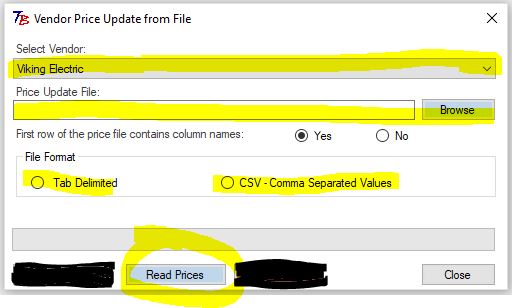
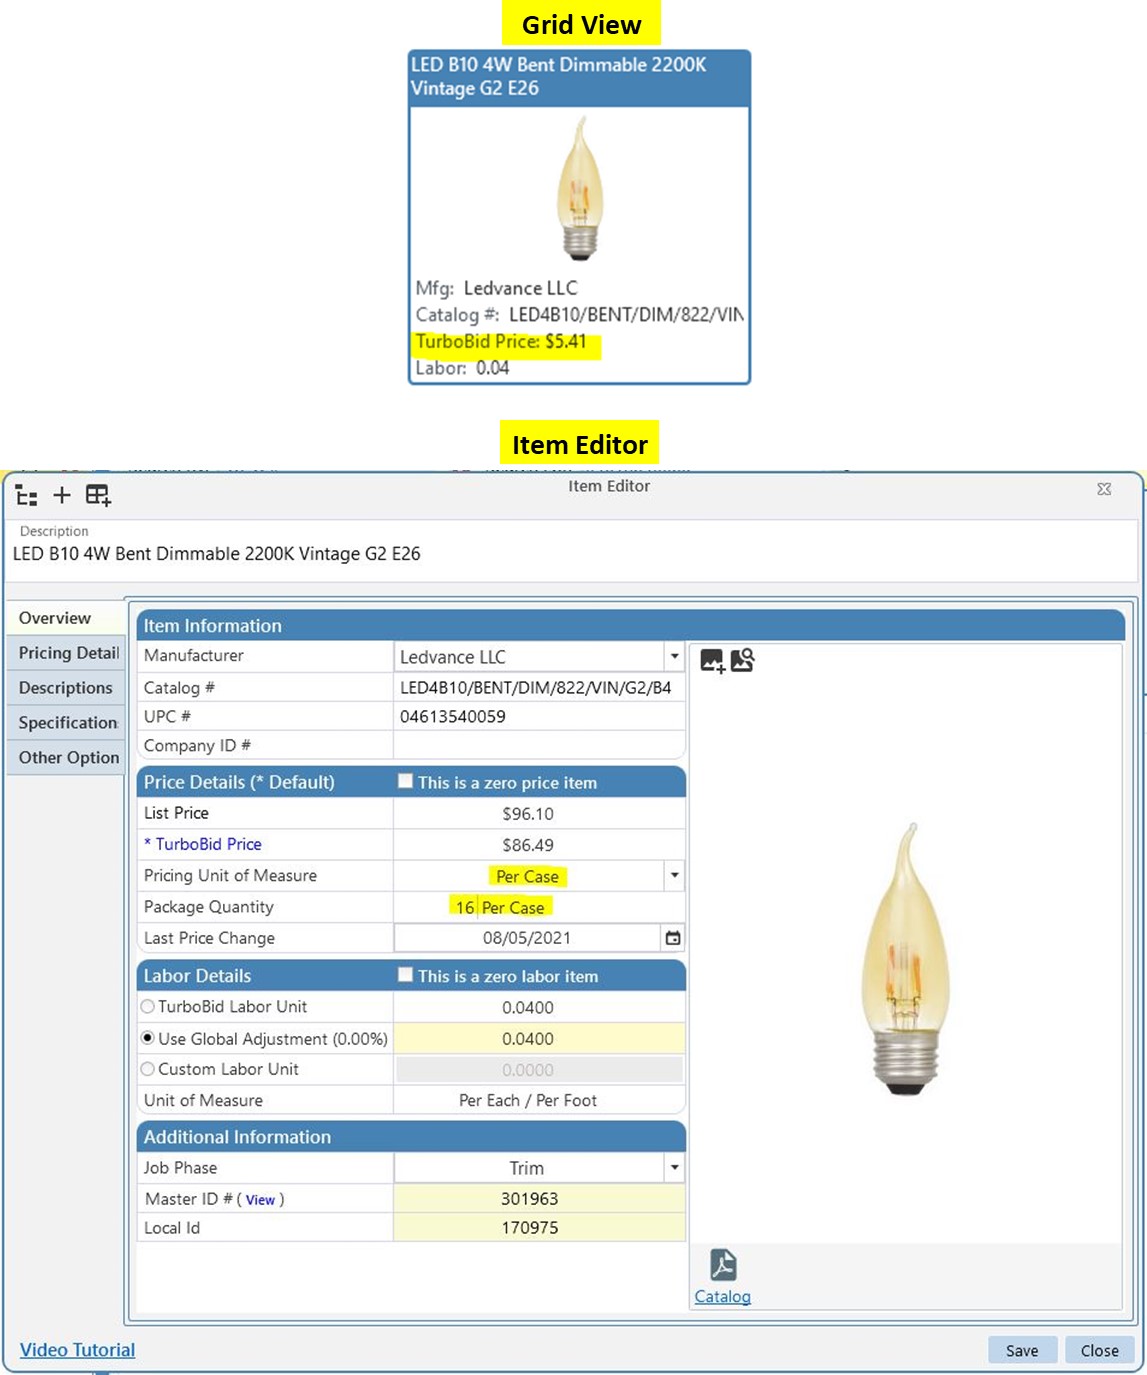
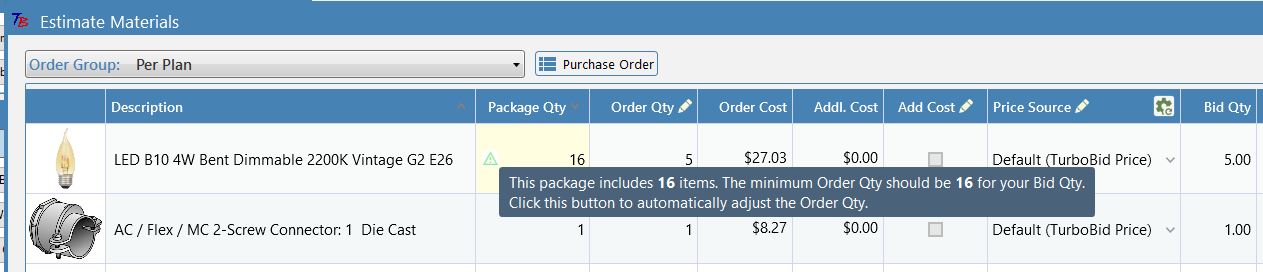
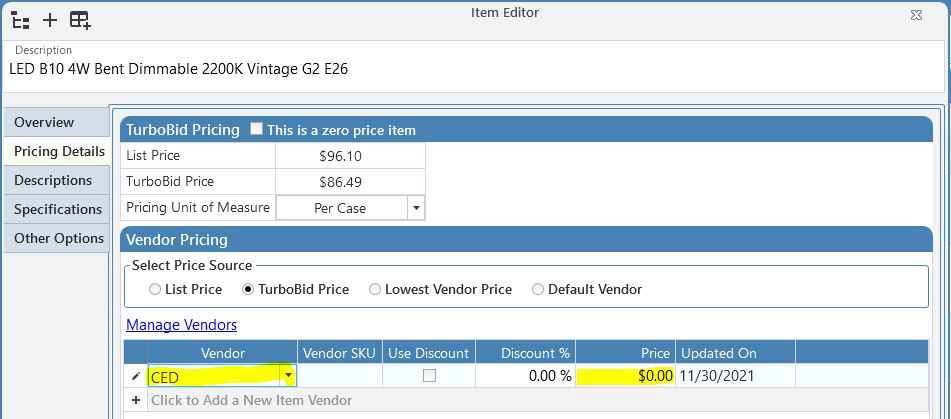
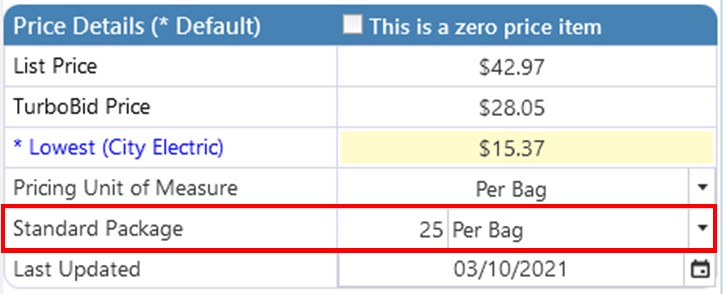
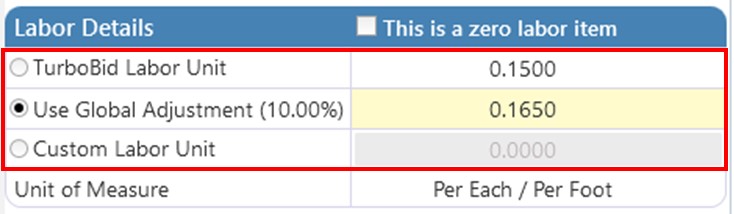
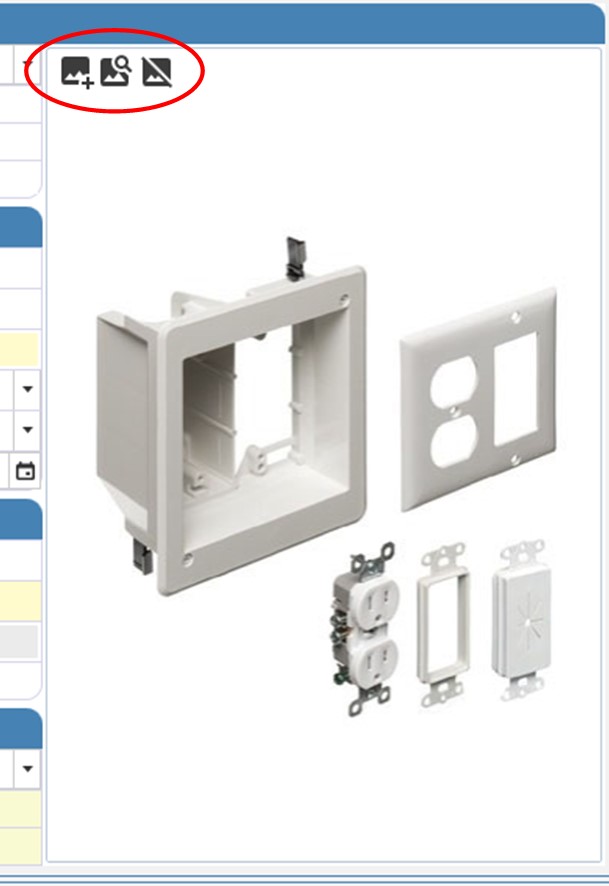
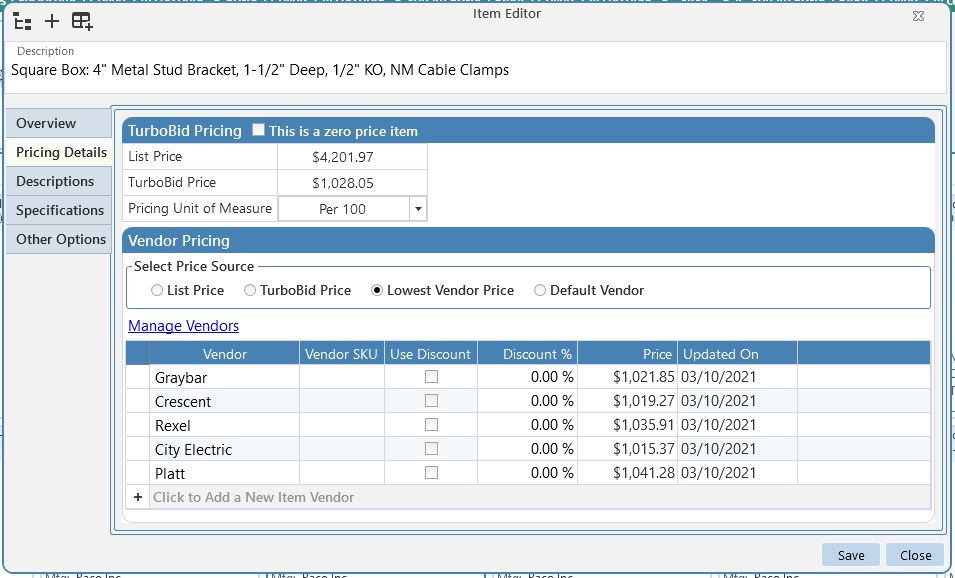
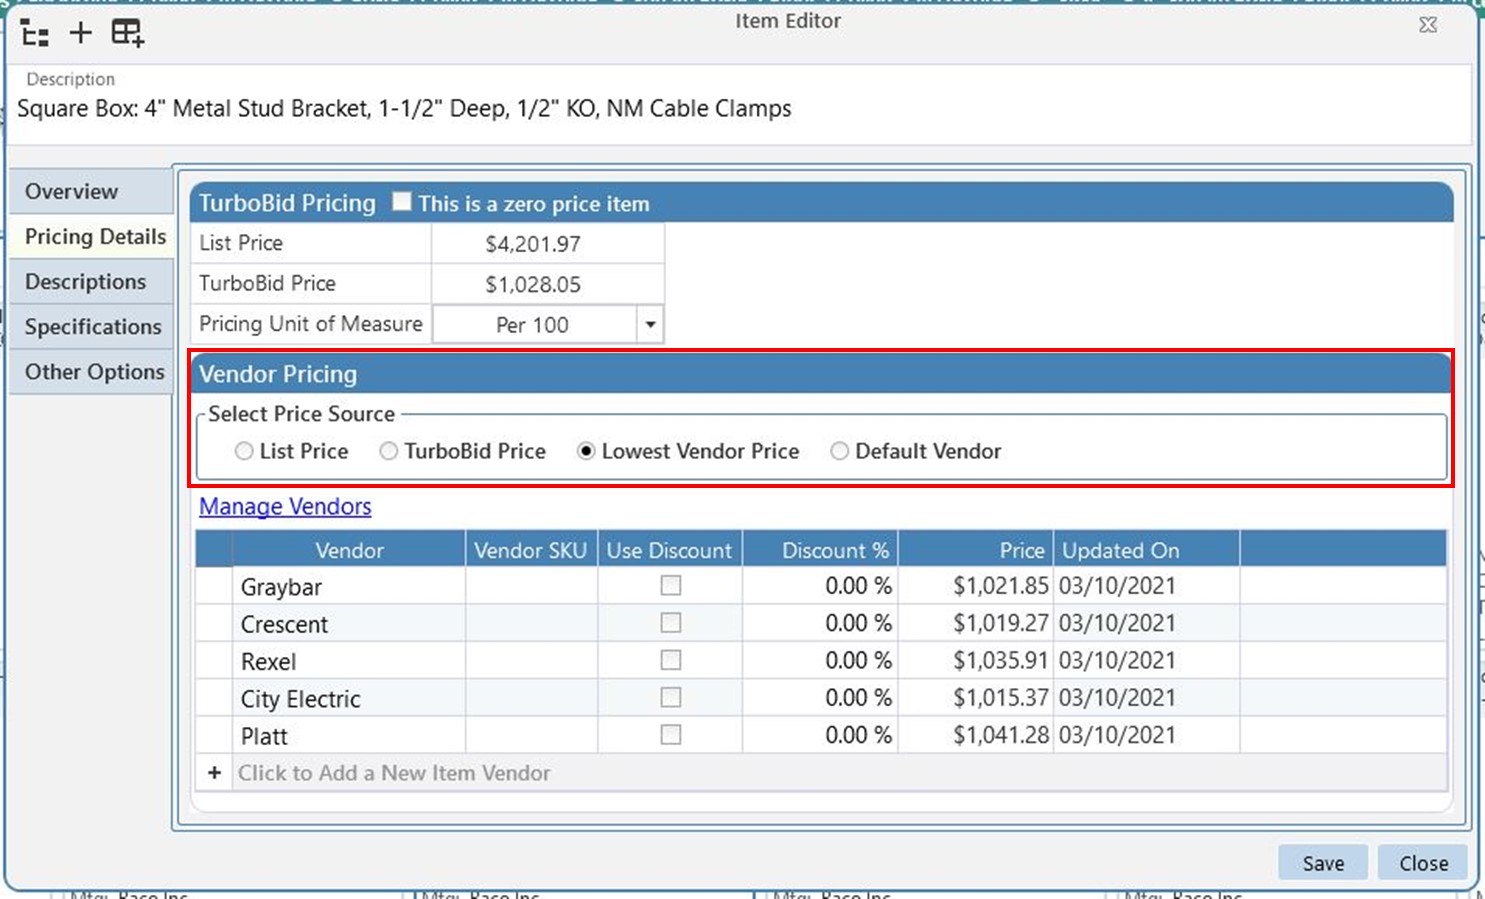
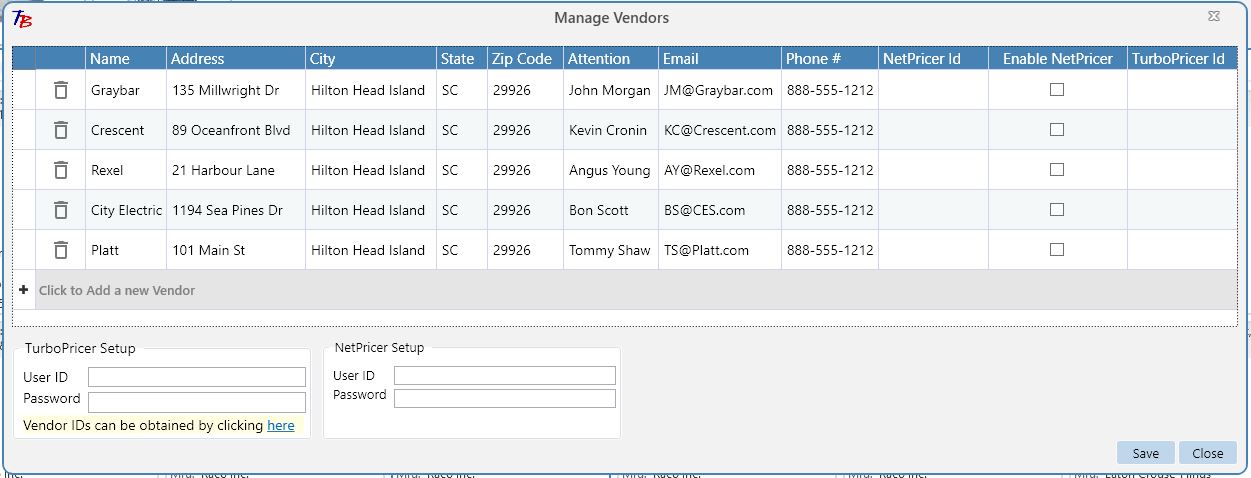
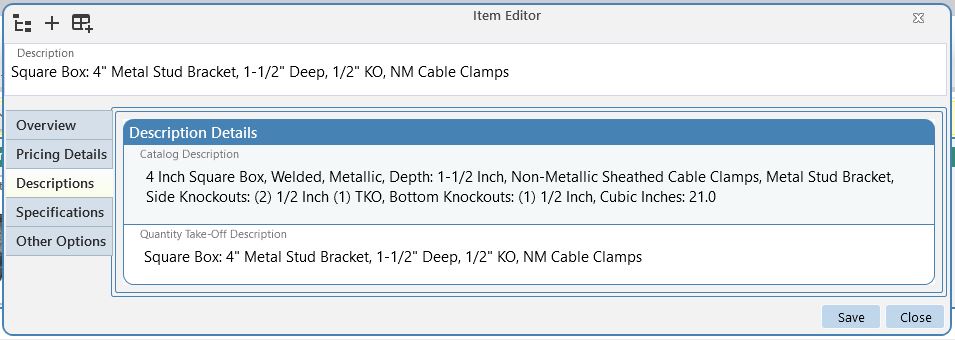
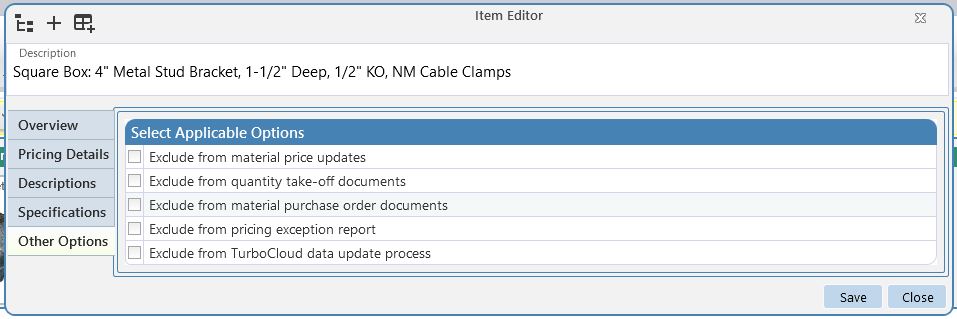
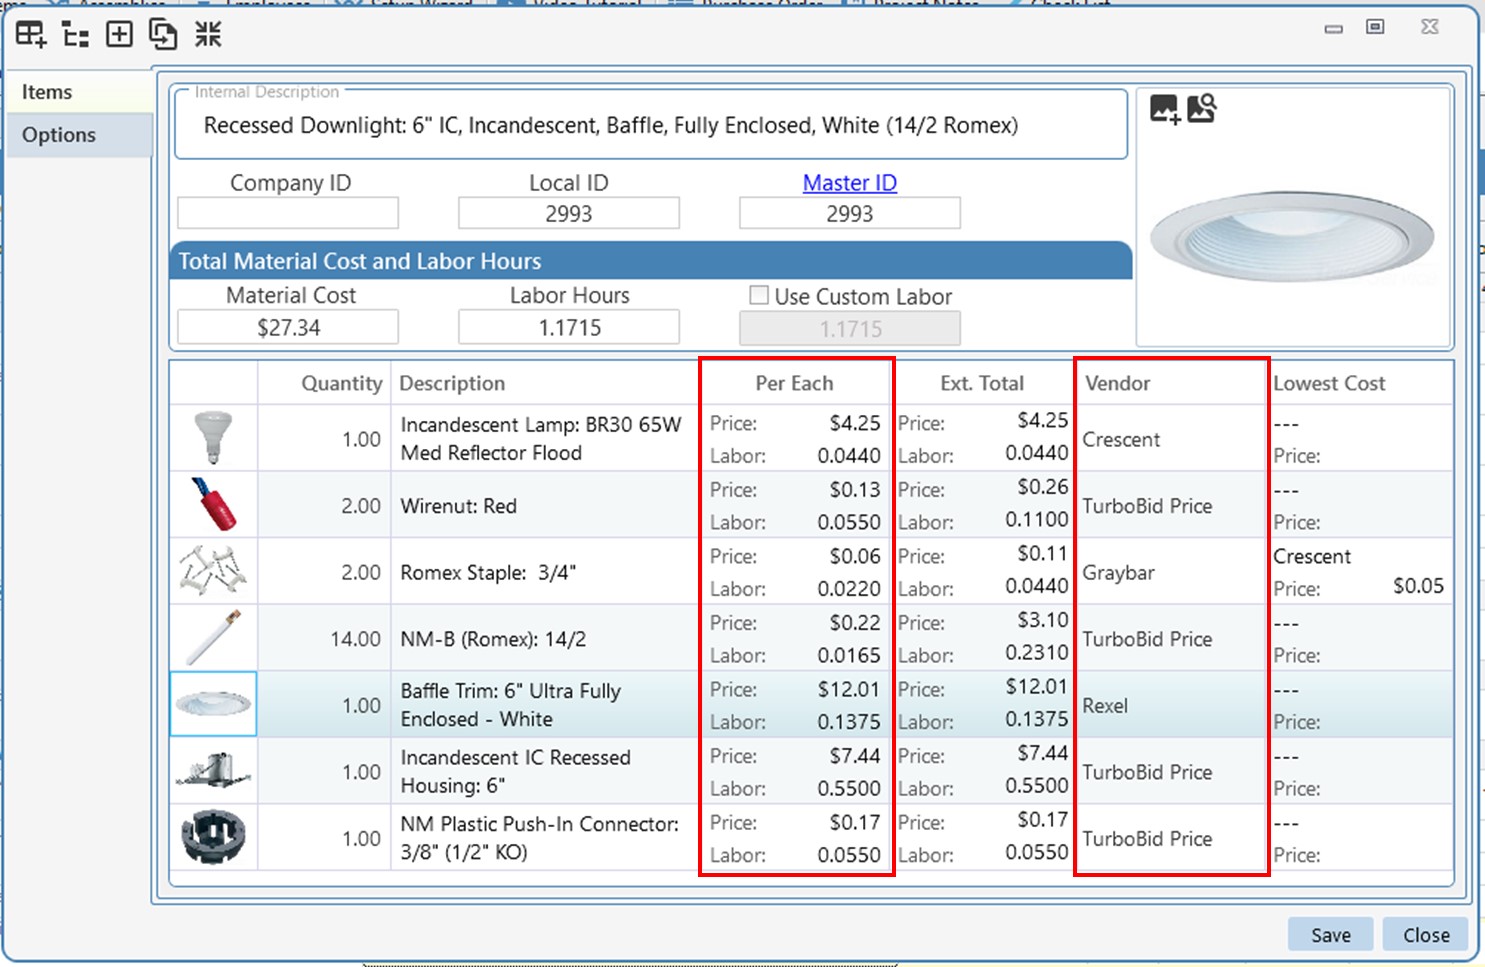
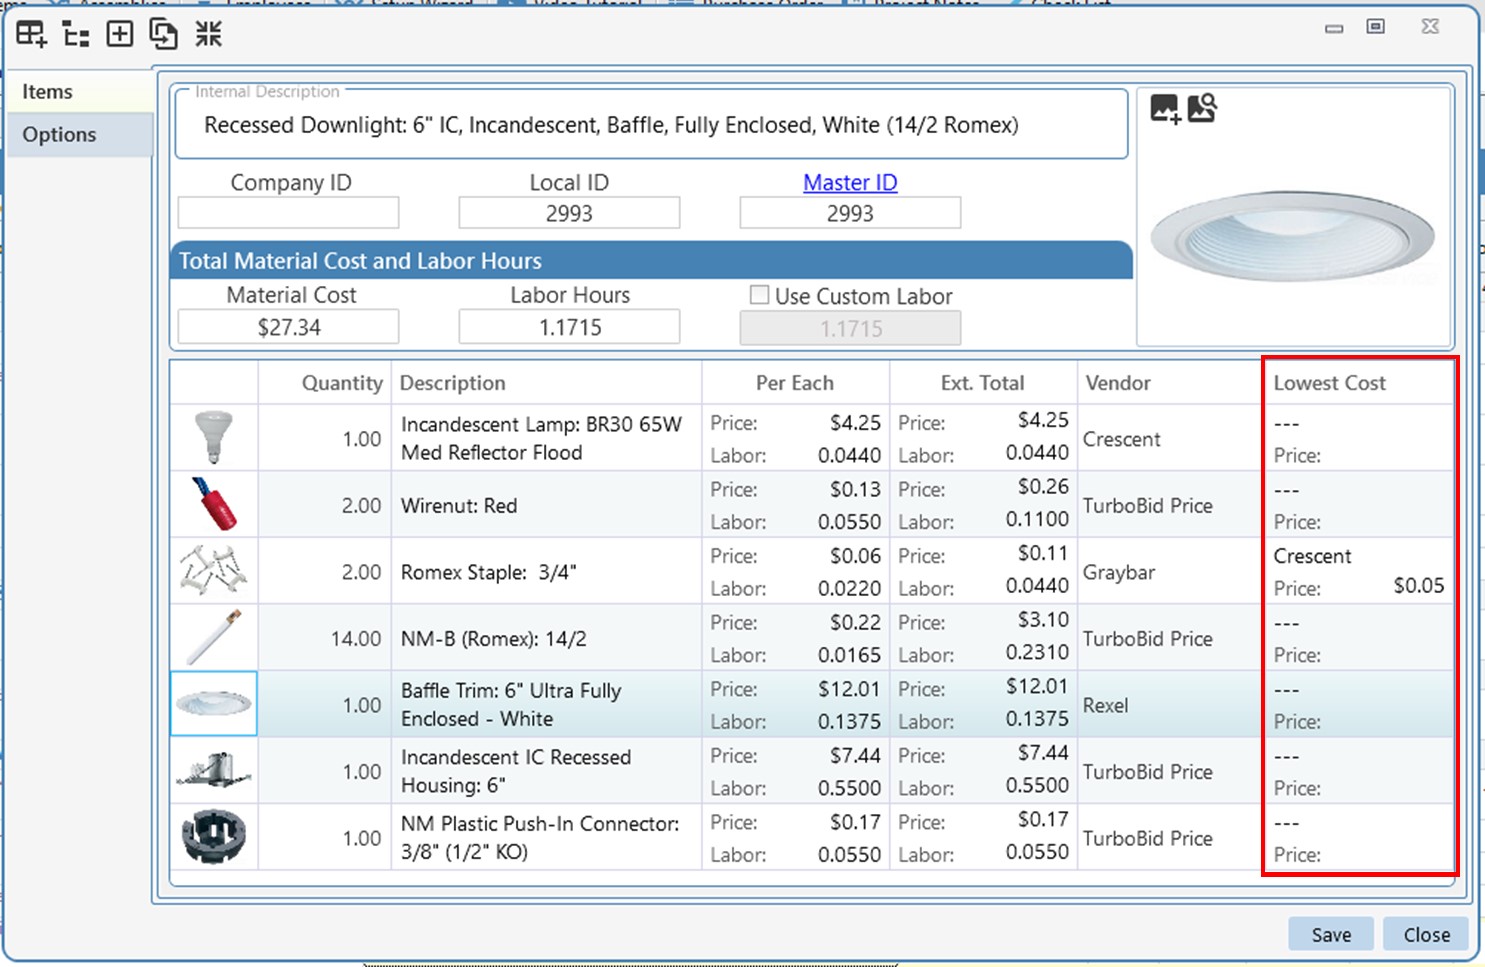
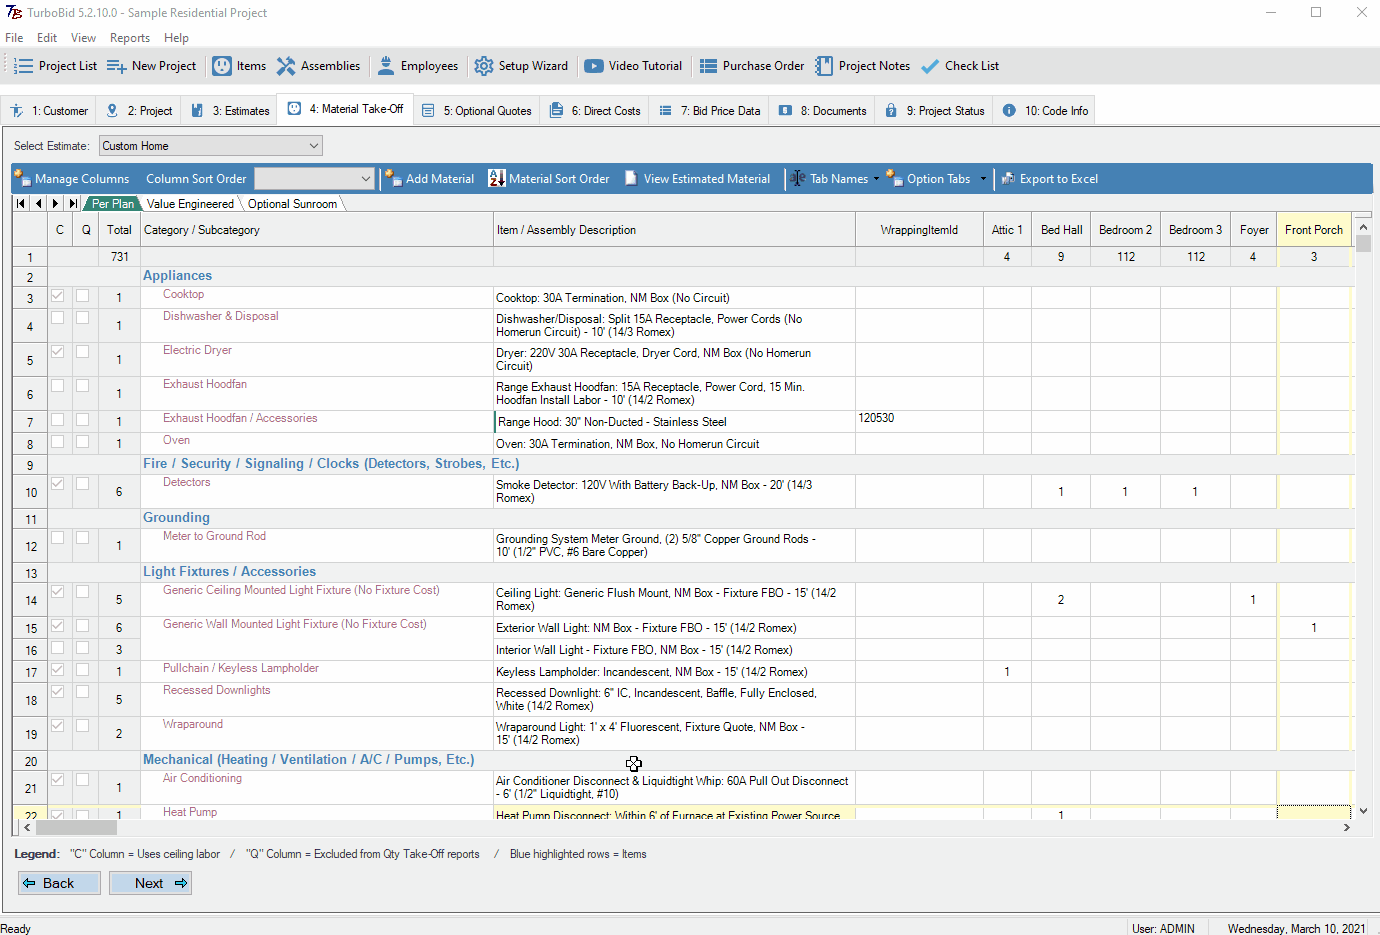
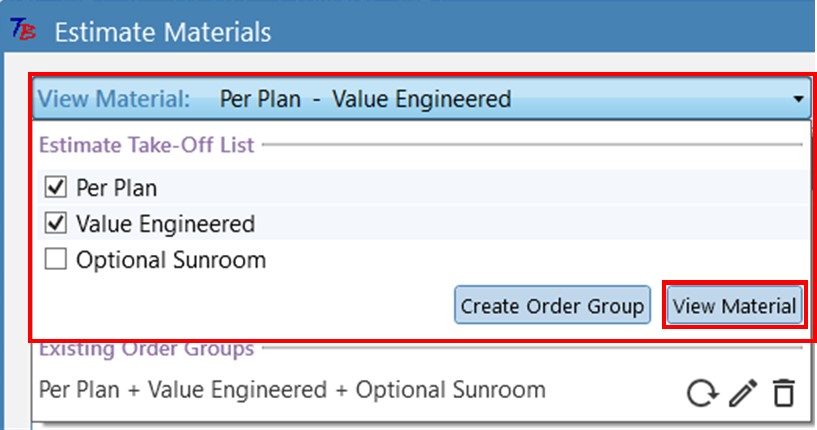
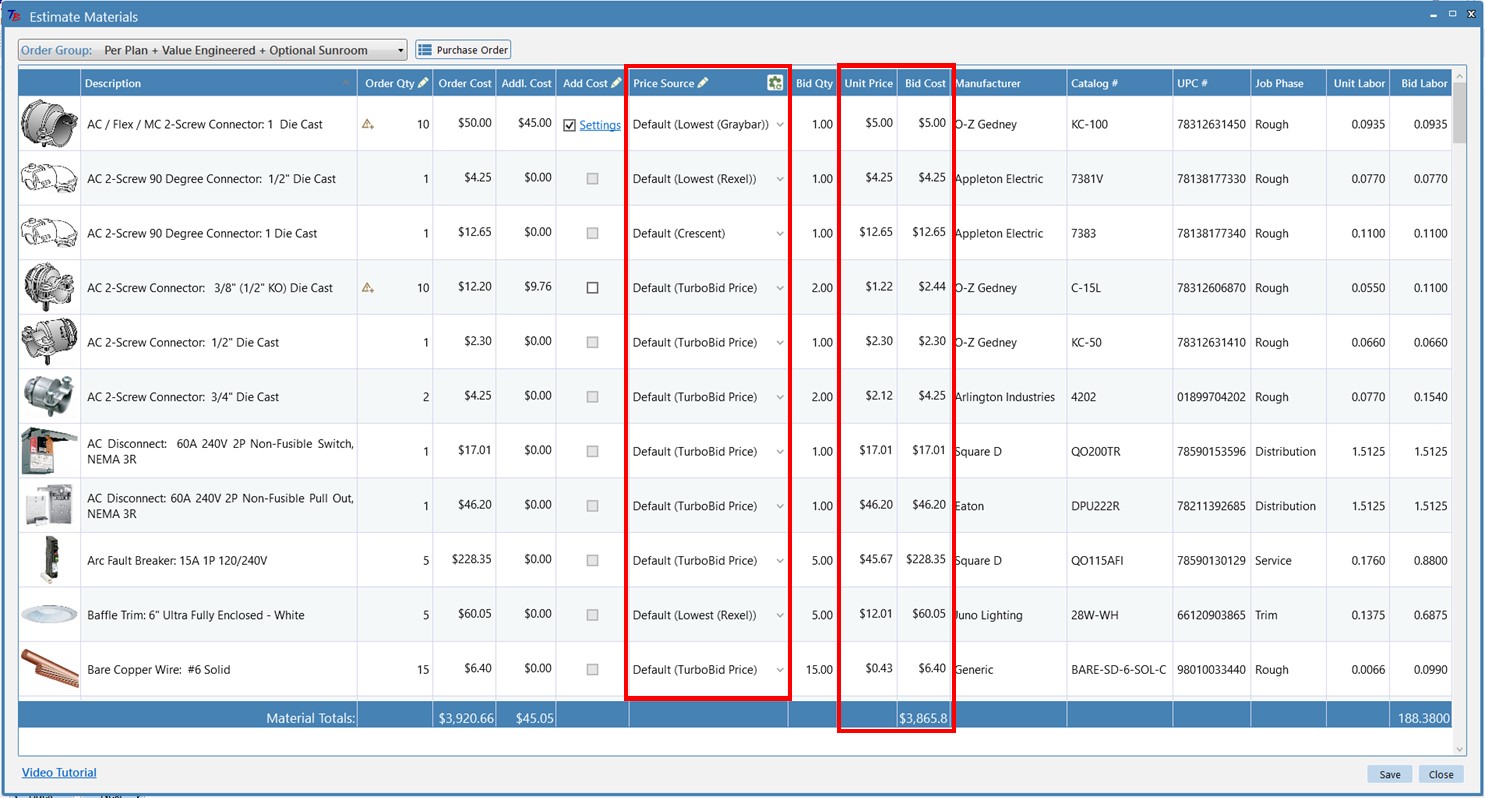
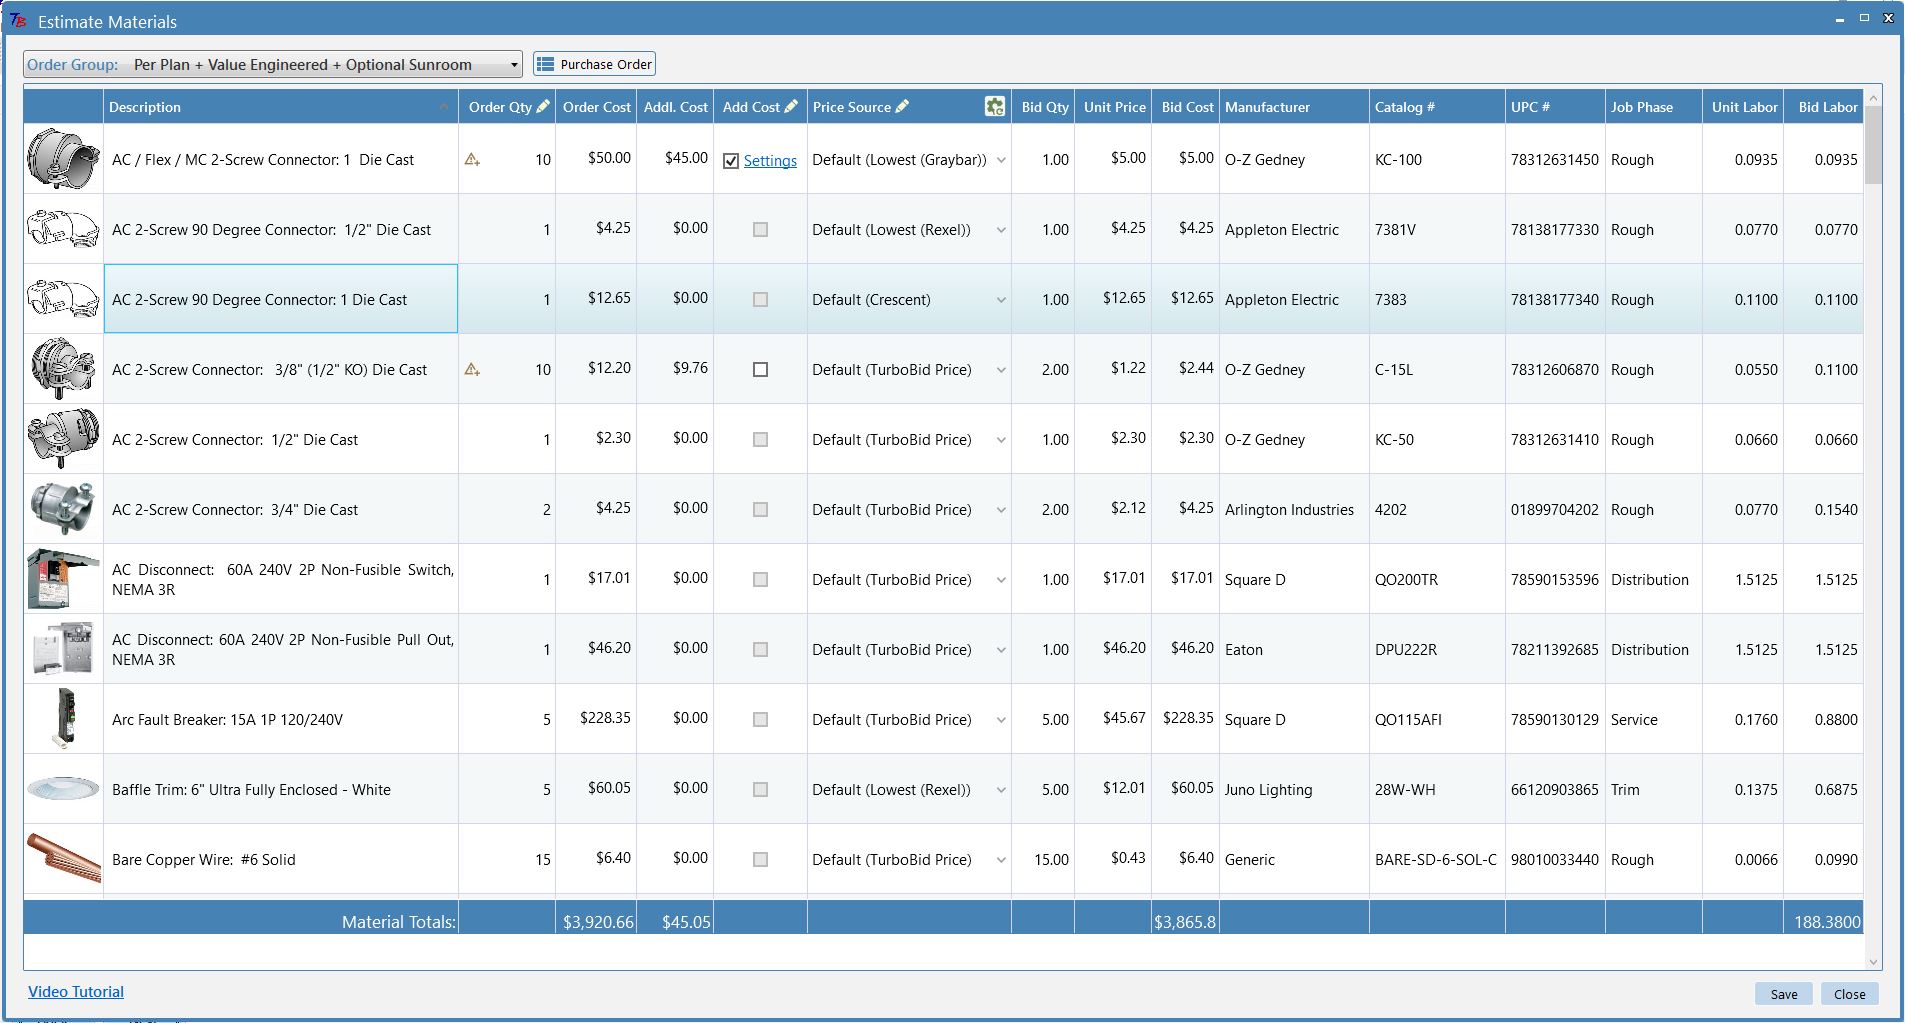
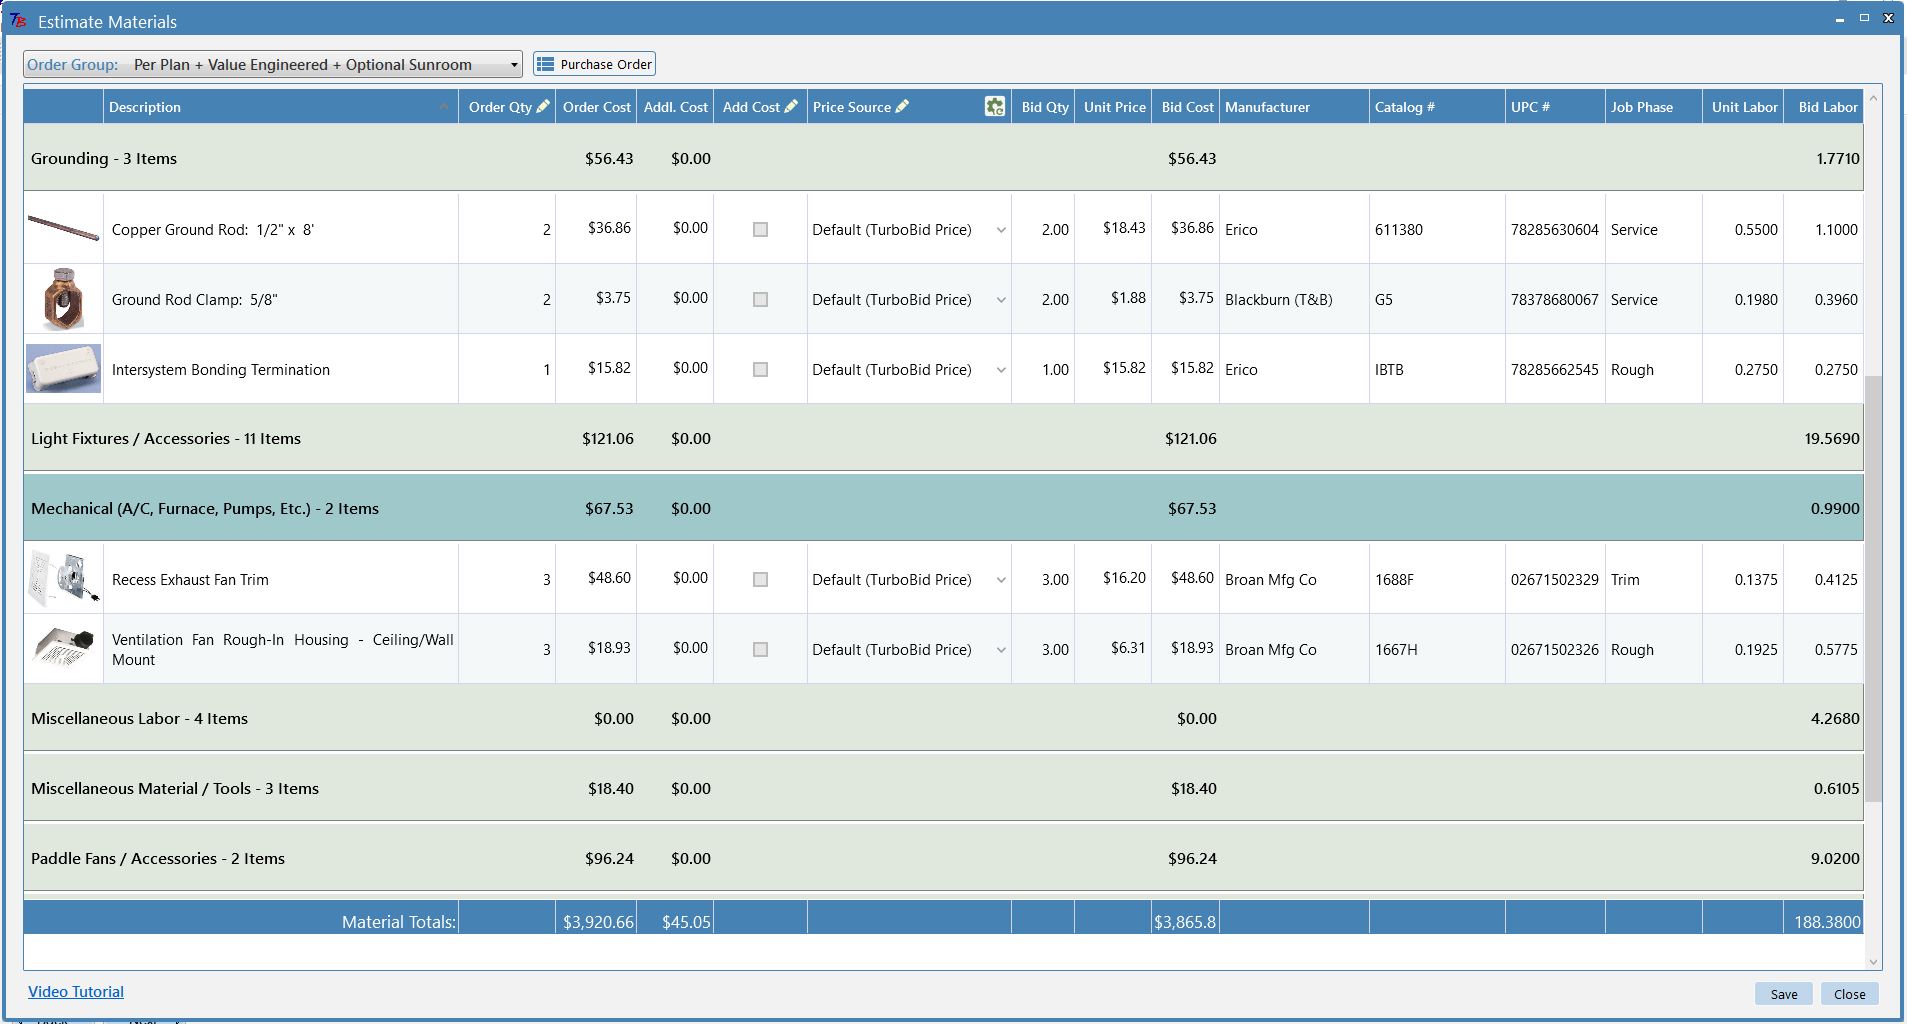
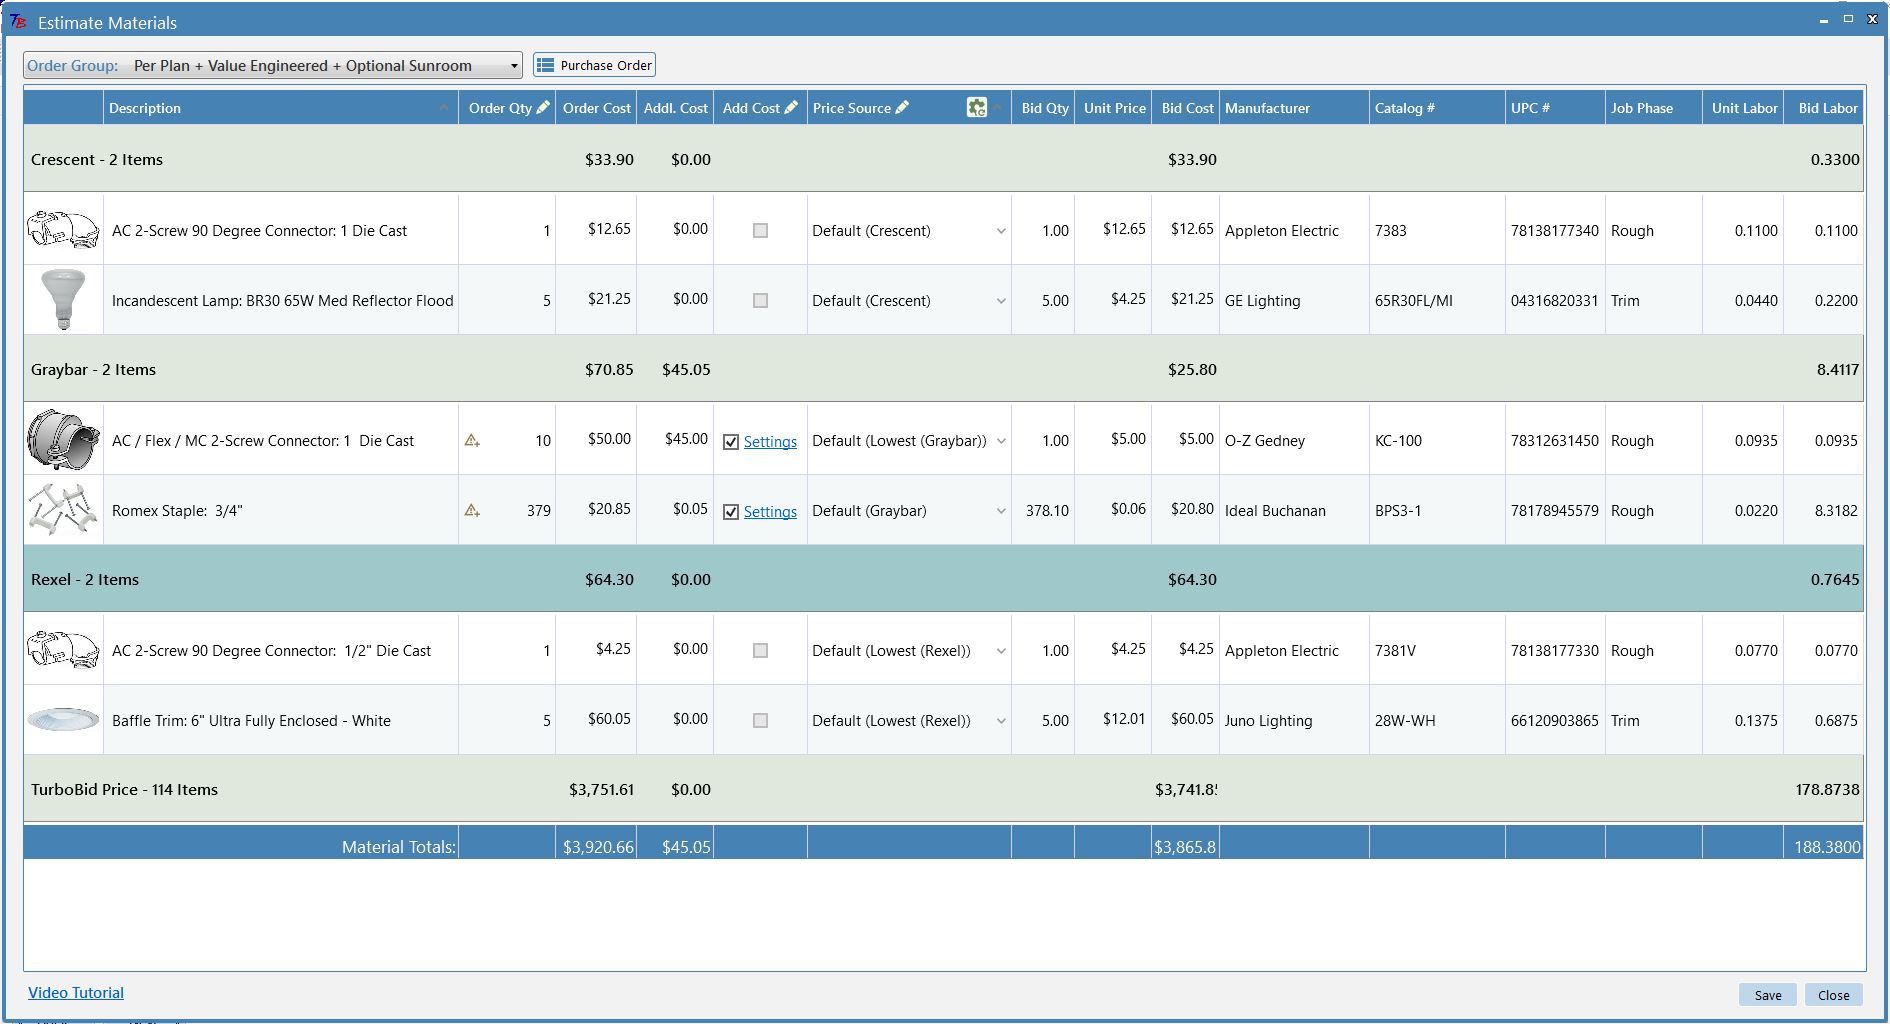
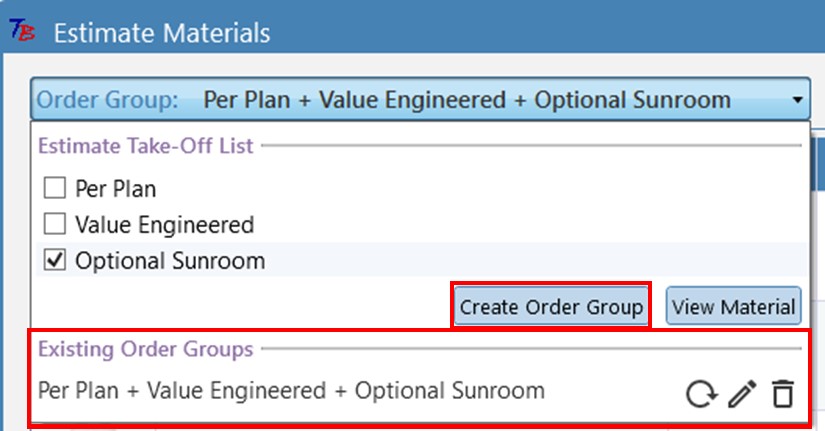
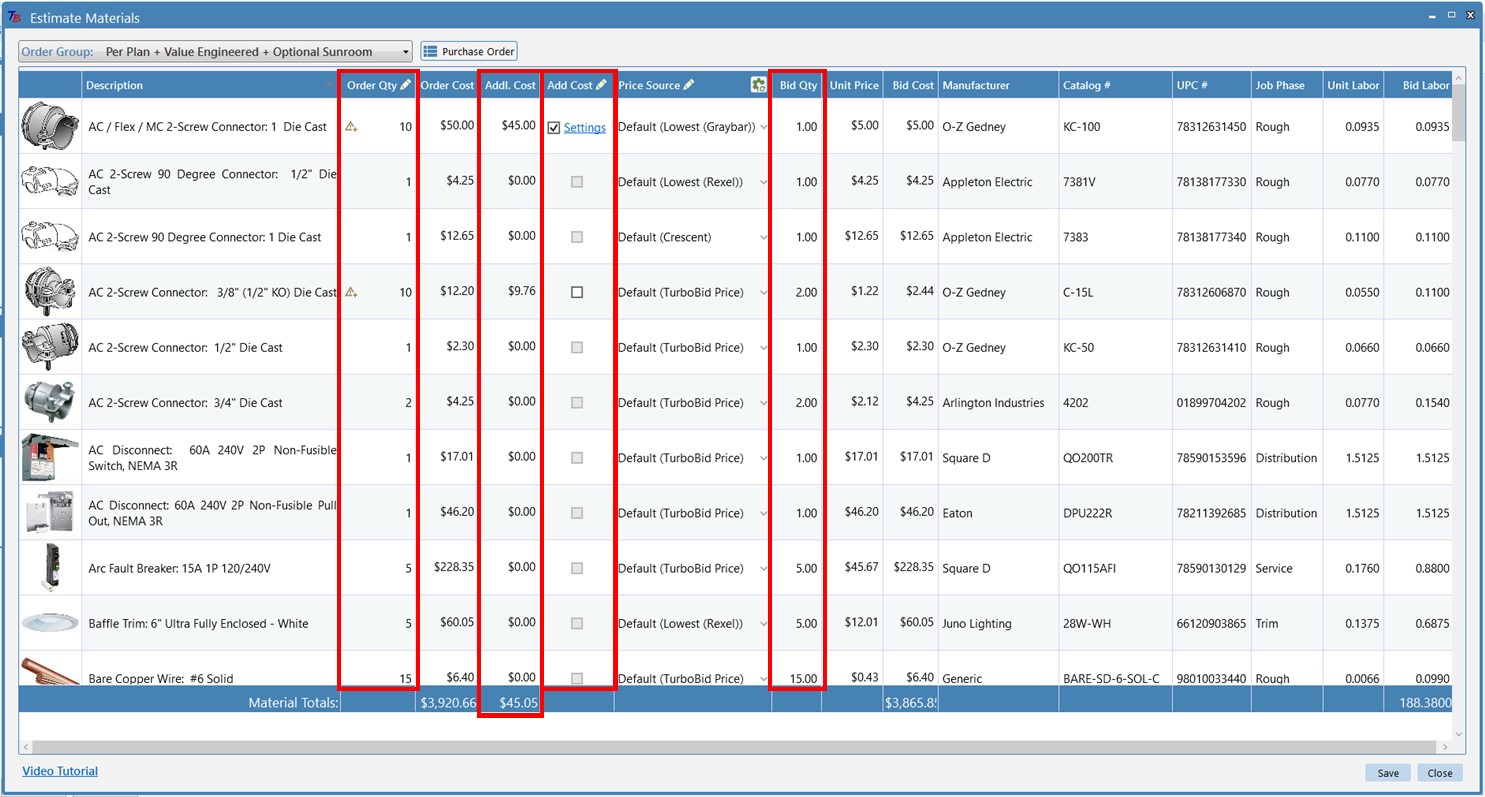
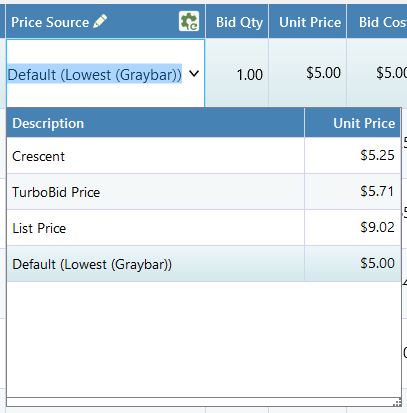
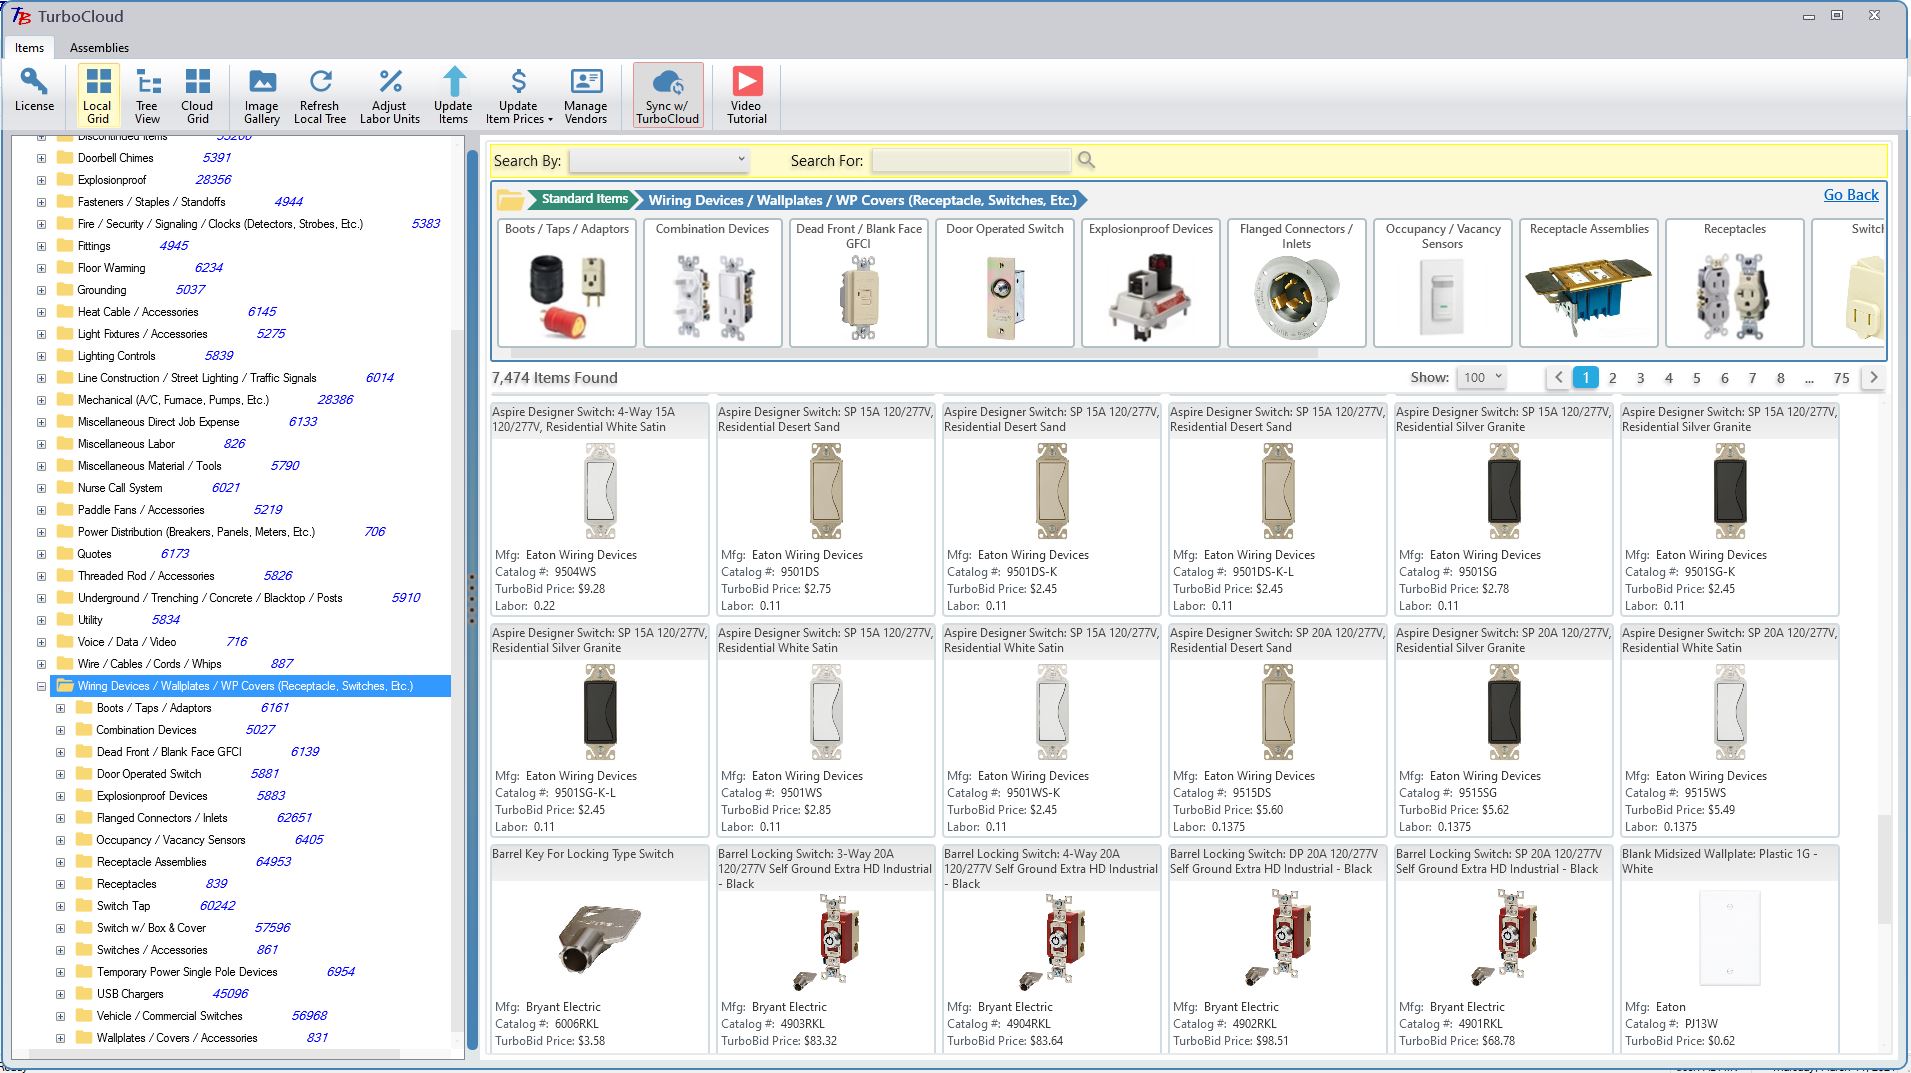
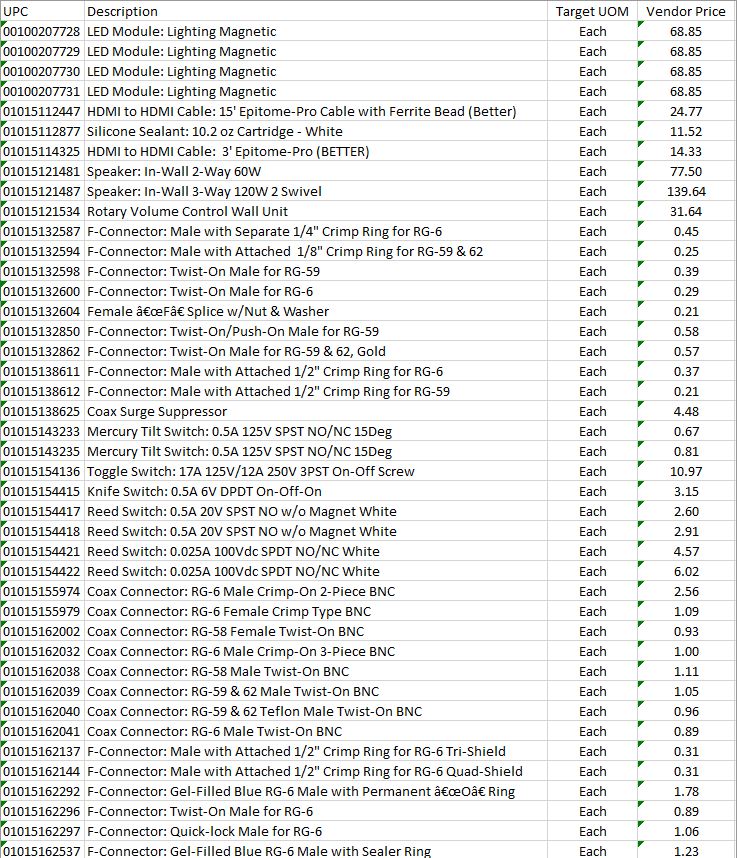
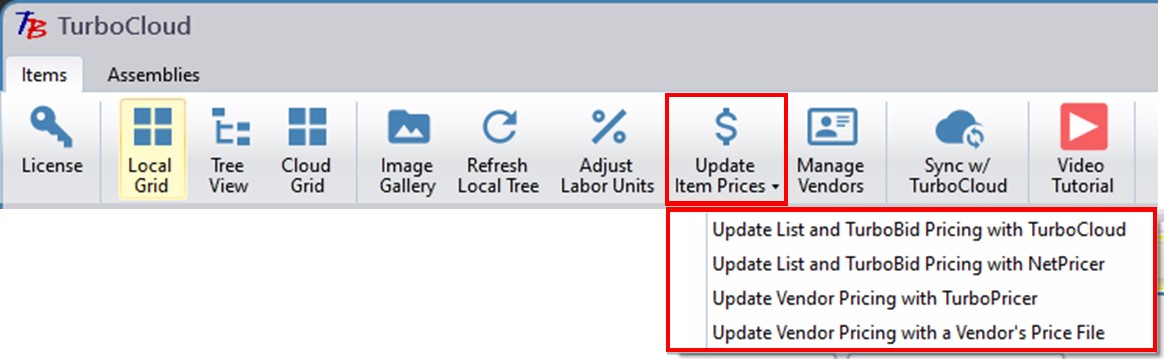
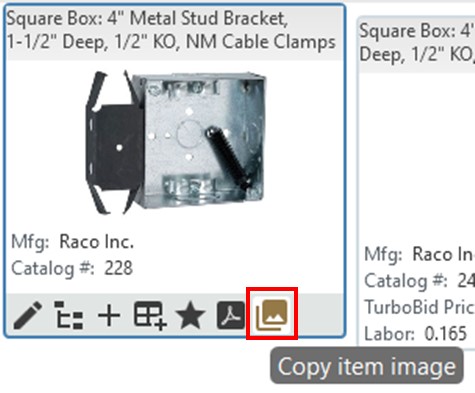
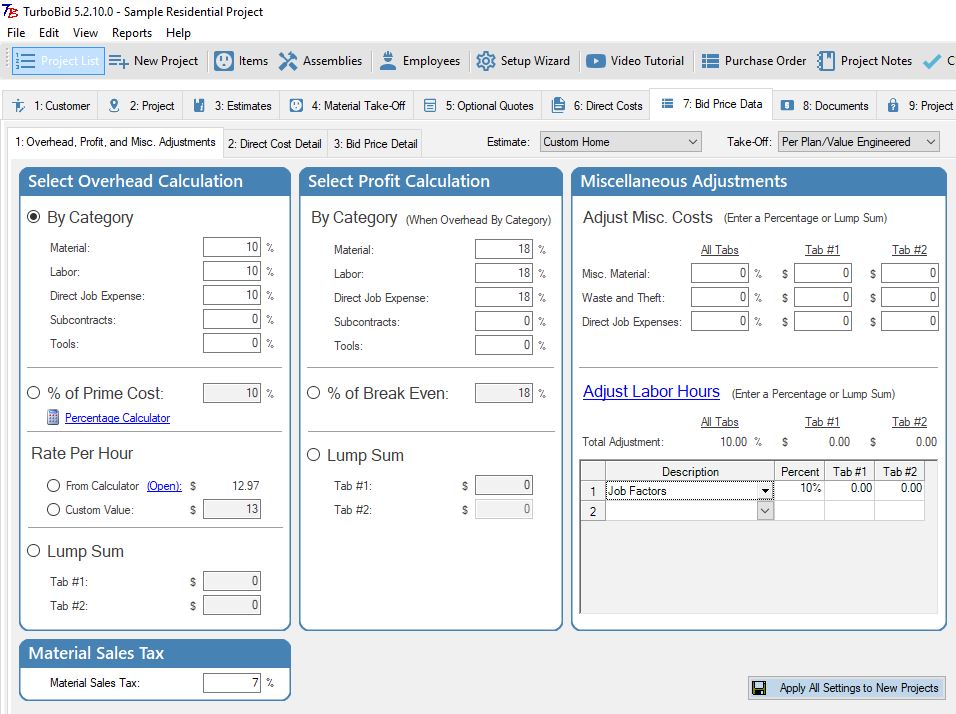
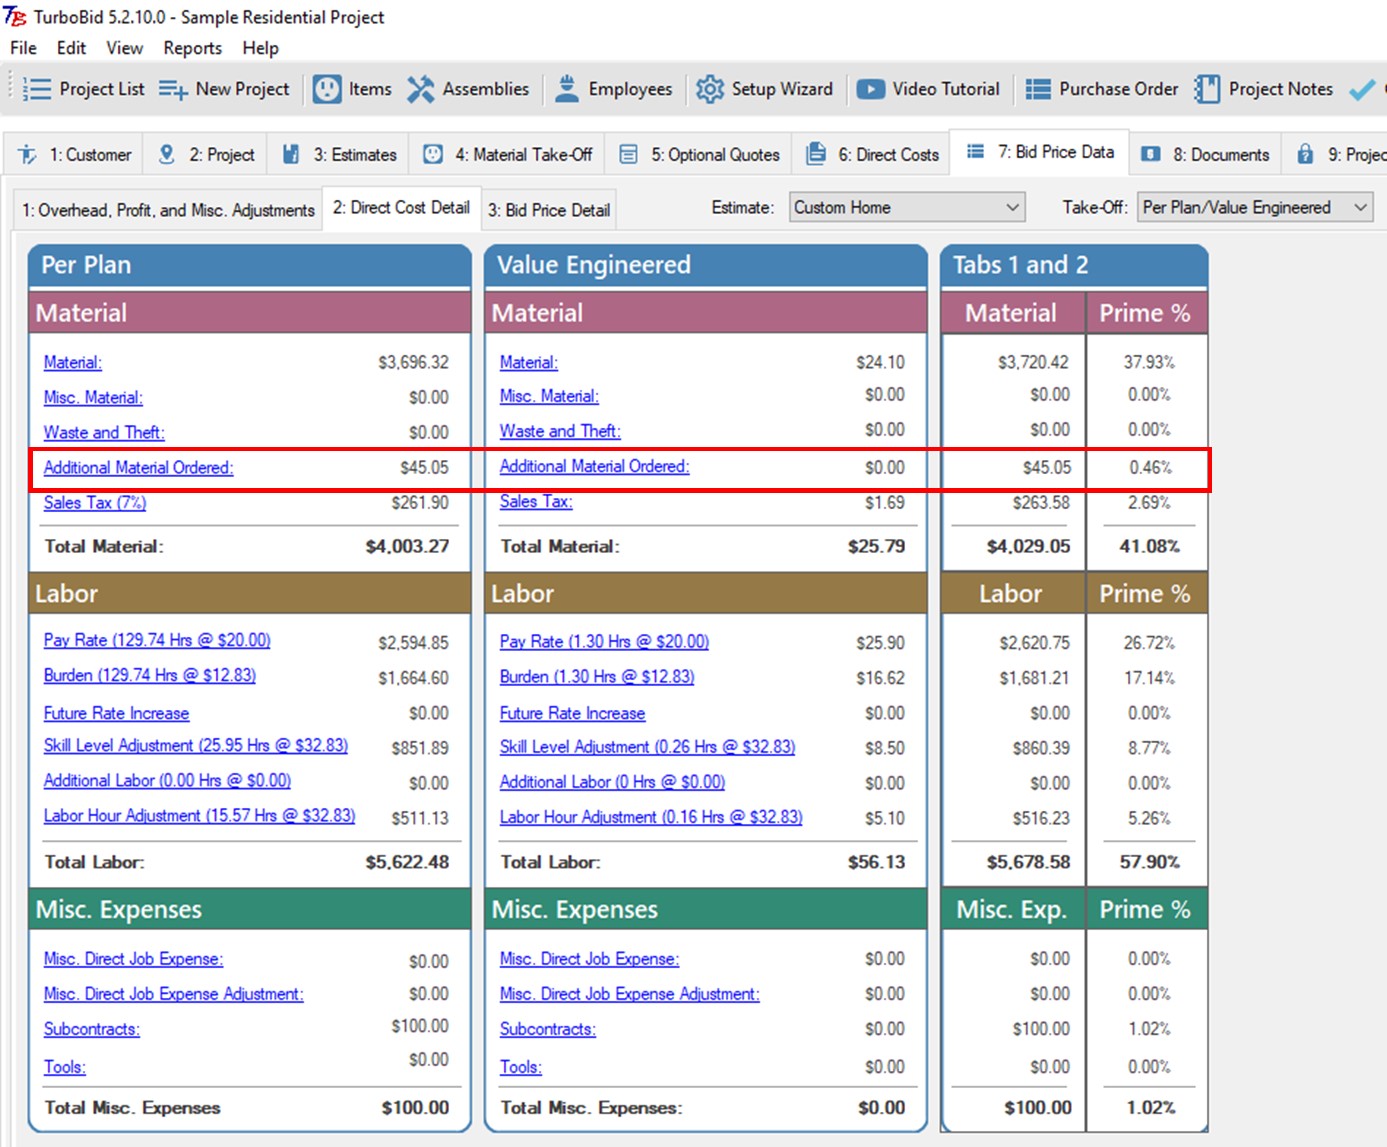
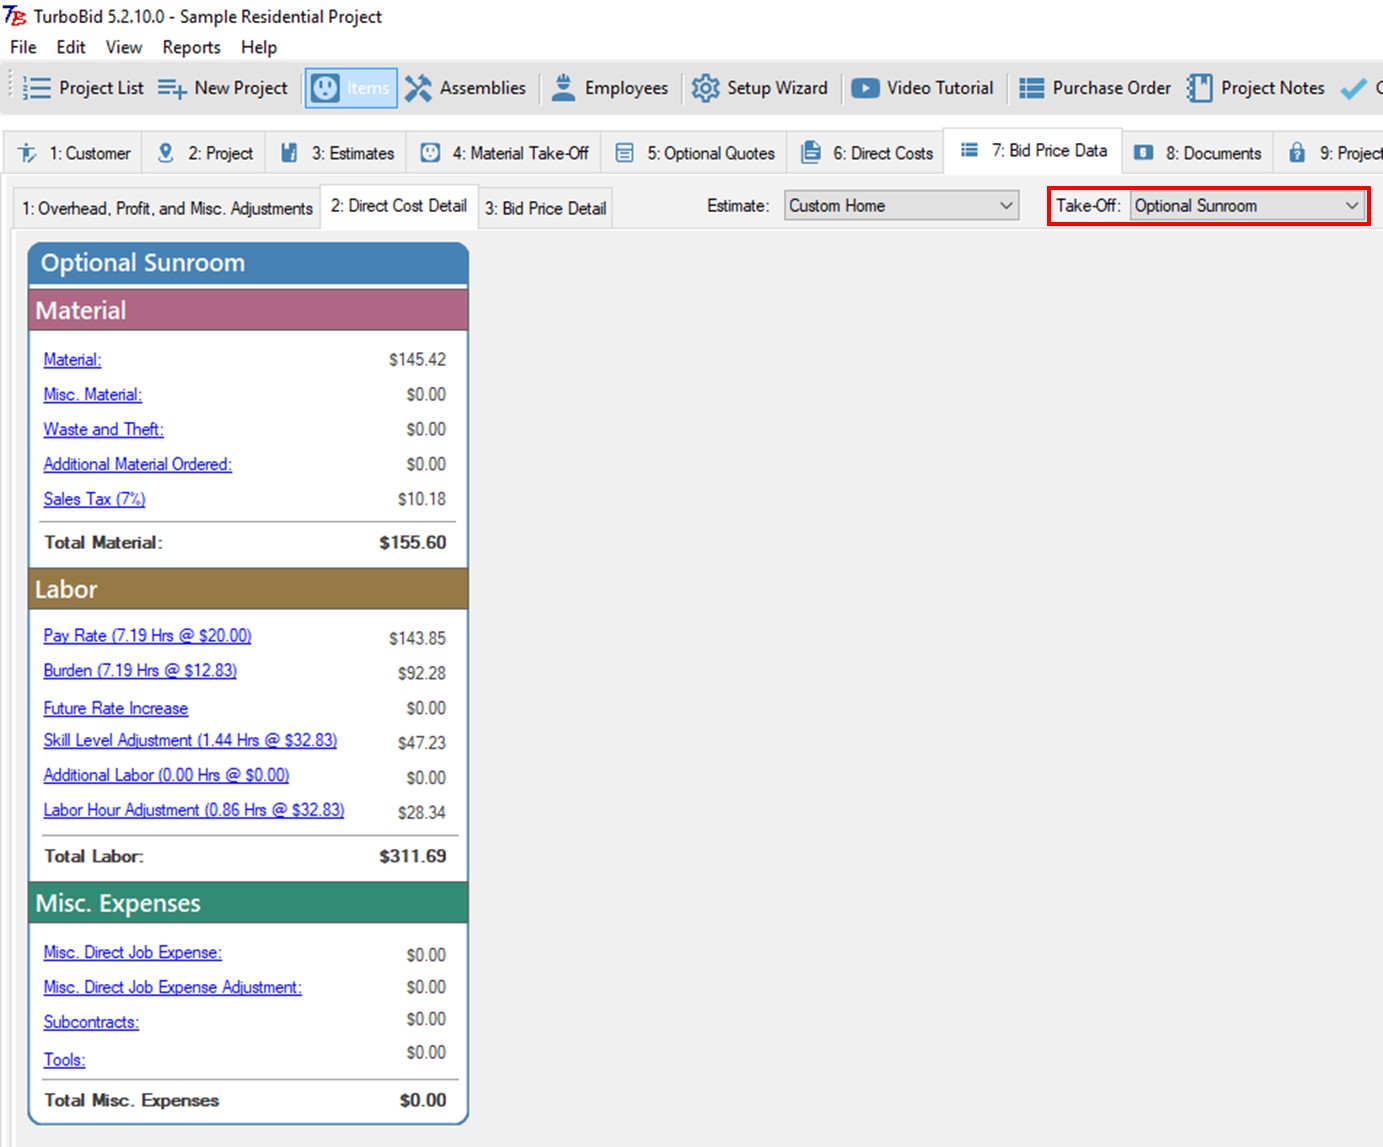
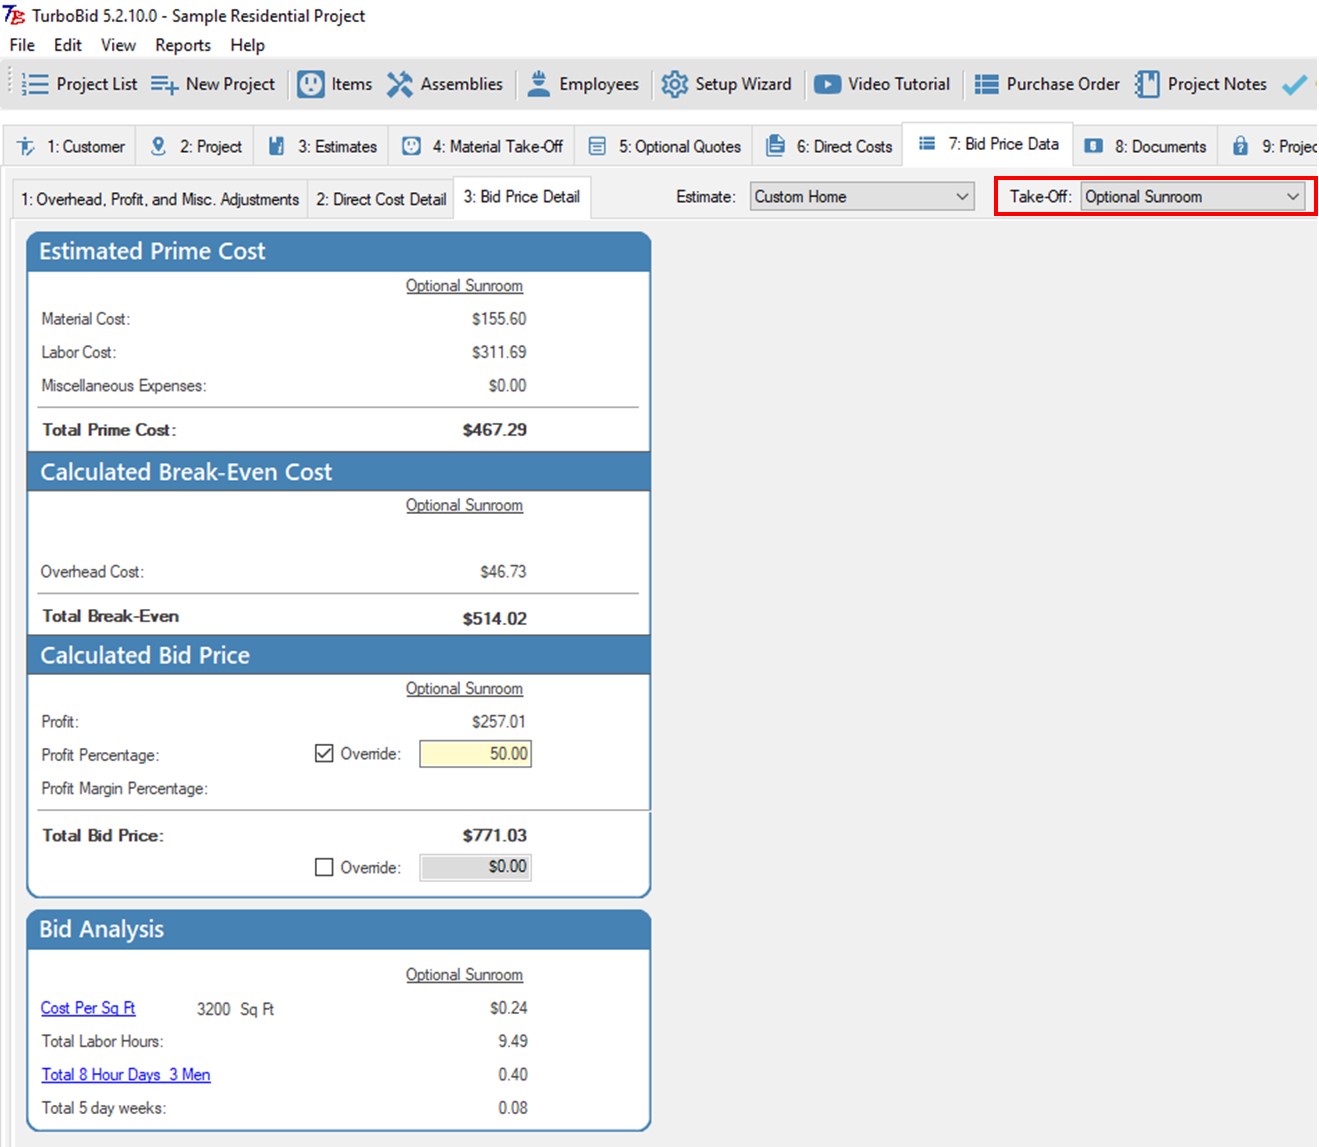
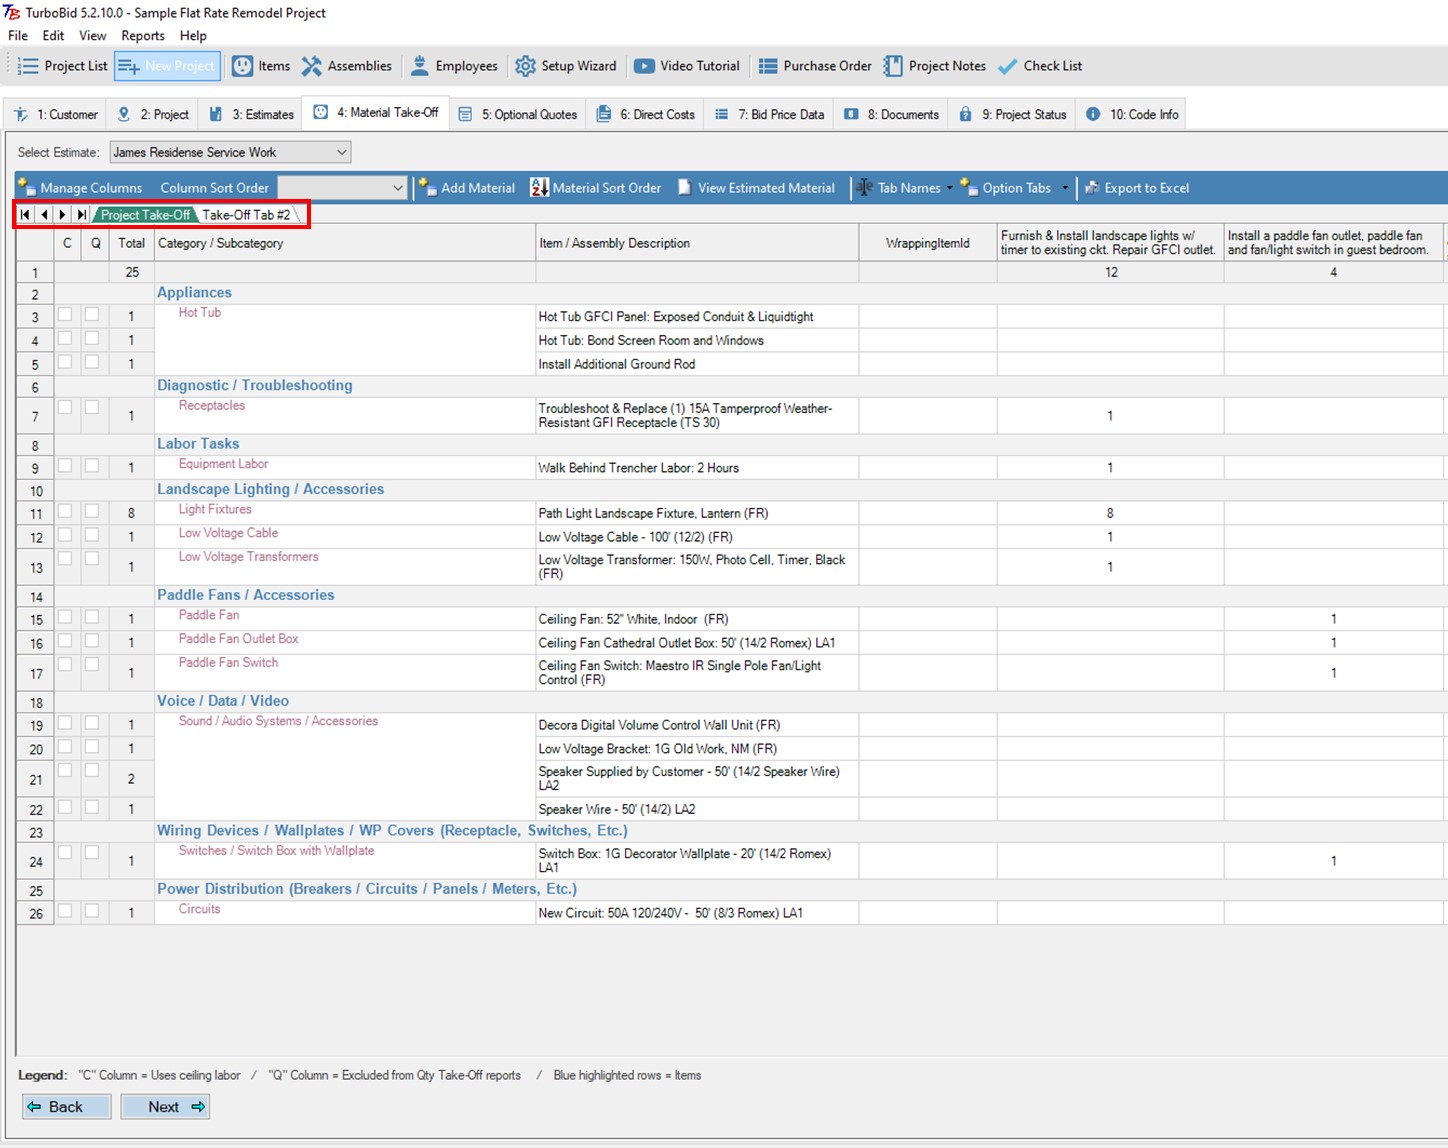
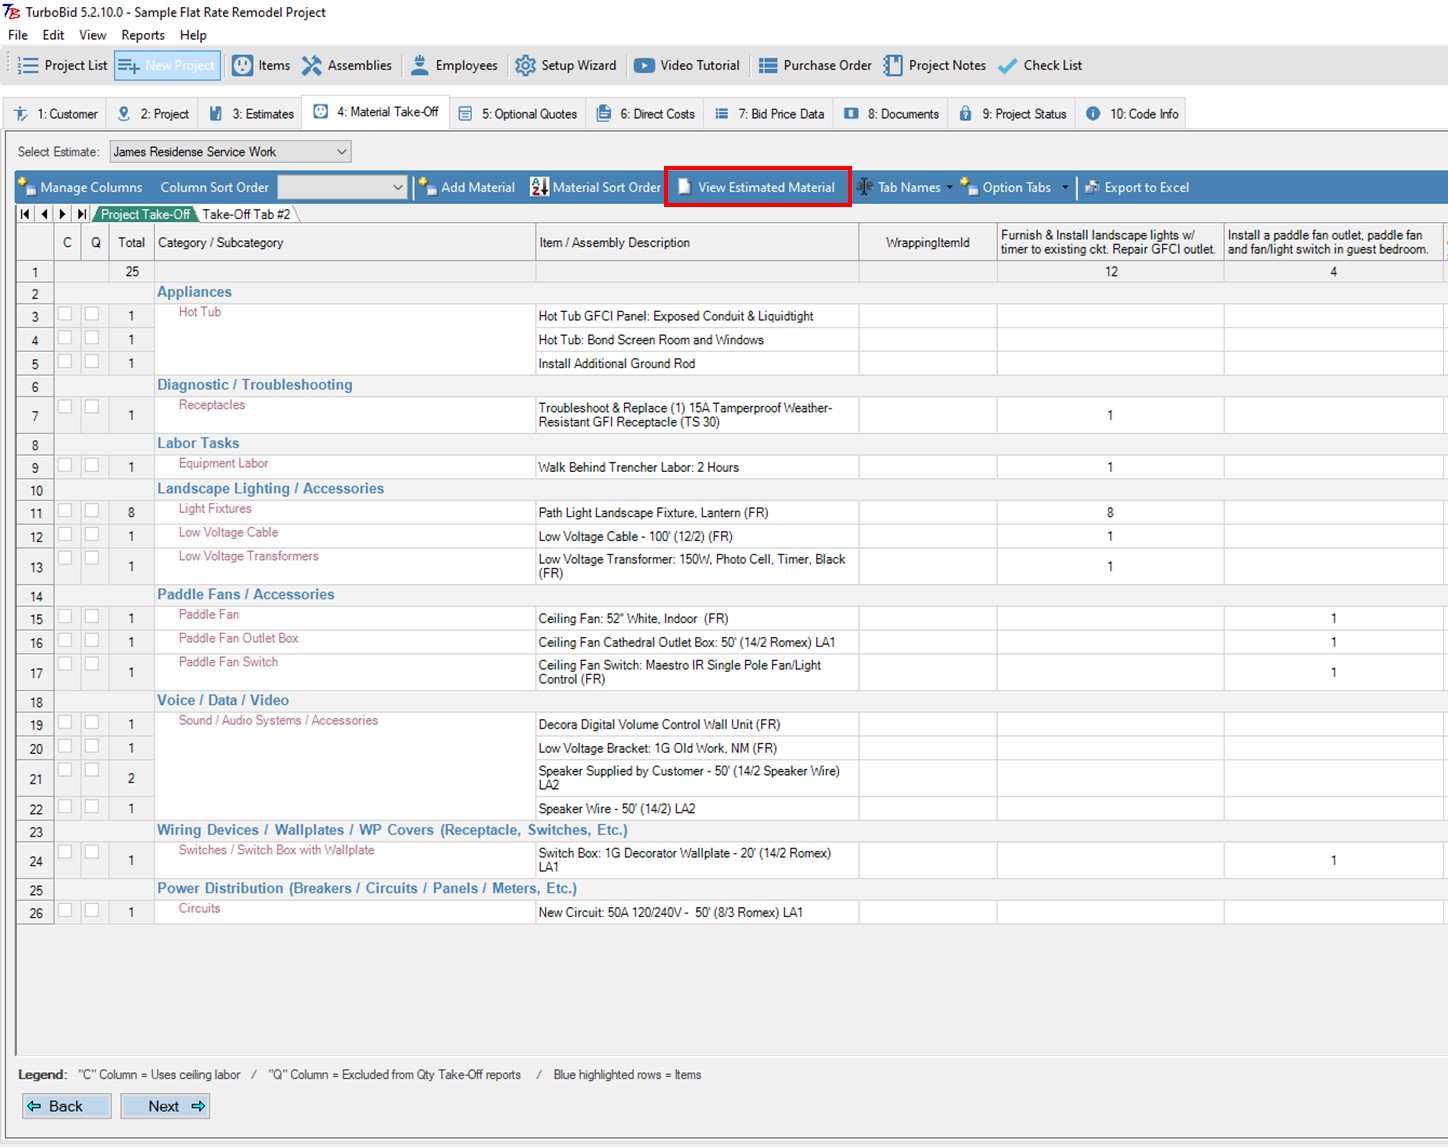
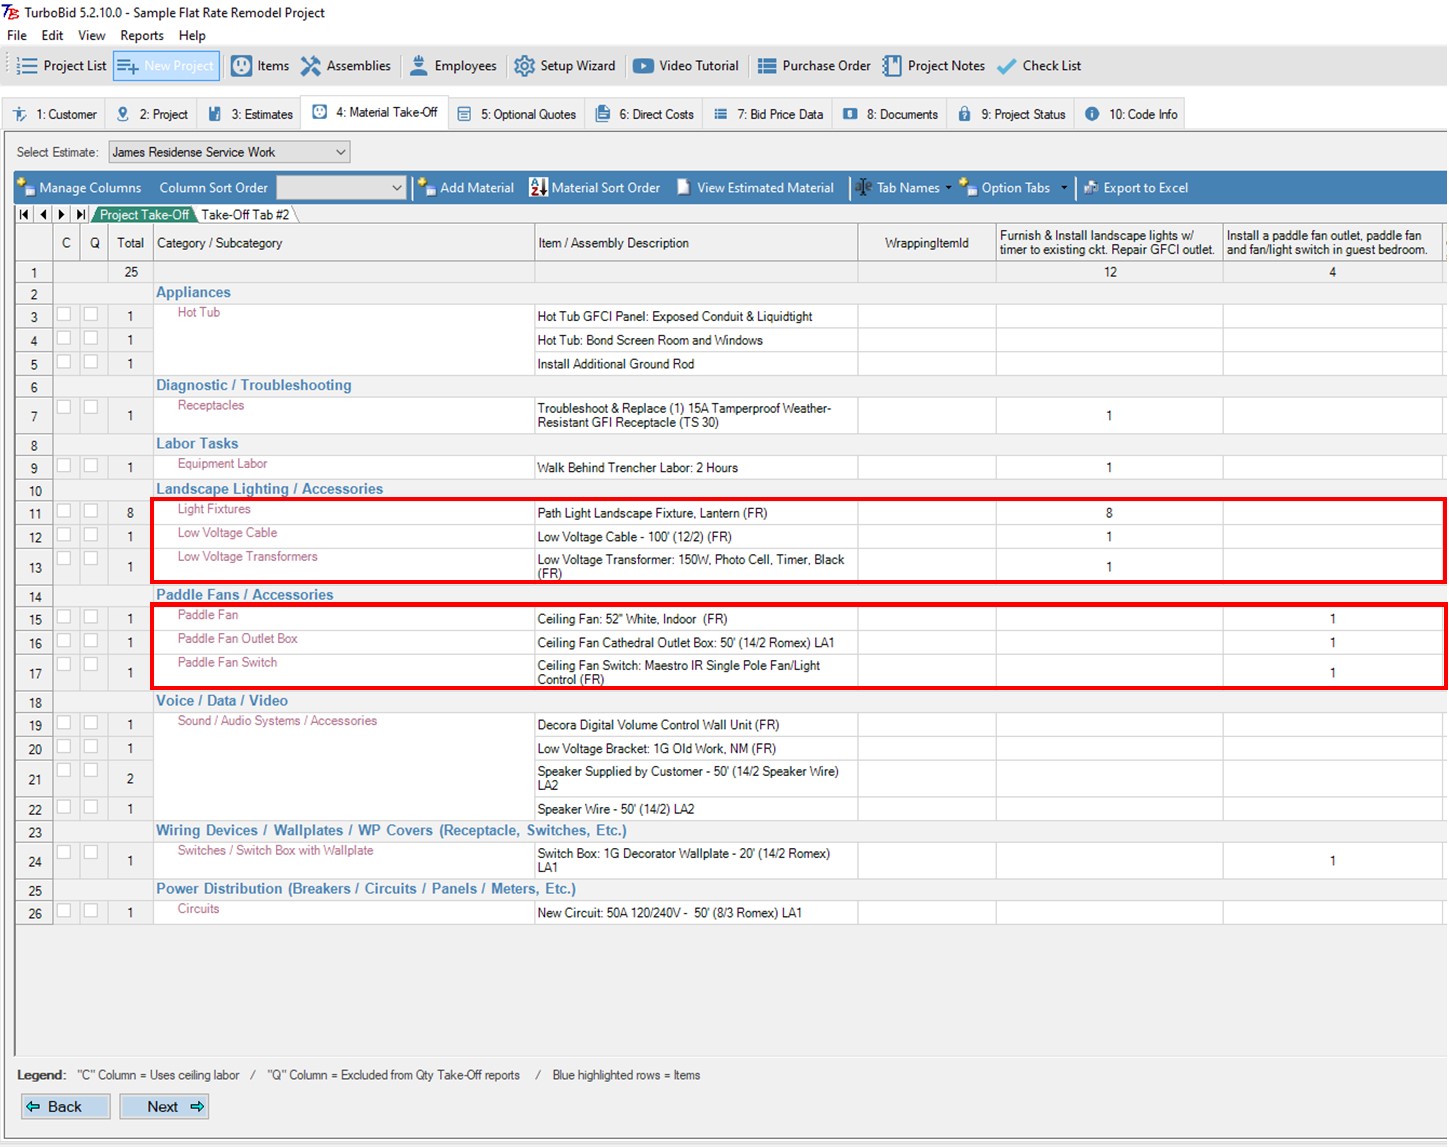